There are lots of reasons for building your own PC. It's a fun experience, you know exactly what's in your computer, and you can build it exactly to your specifications, knowing exactly what your upgrade path is.
There are also a lot of good reasons for choosing microATX: it's more compact than a full-sized ATX system, the prices are pretty low, and it's easy to work with, whether you're building something for working from home, or want the foundation of a gaming PC.
While you'll have to choose yourself what you put into your PC, follow on for our guide on how to get started.
Planning your microATX computer
Every computer has the same major components and when it comes to building a PC. MicroATX or not, you're faced with many of the same decisions. If you're building a budget PC, then price becomes one of the major factors.
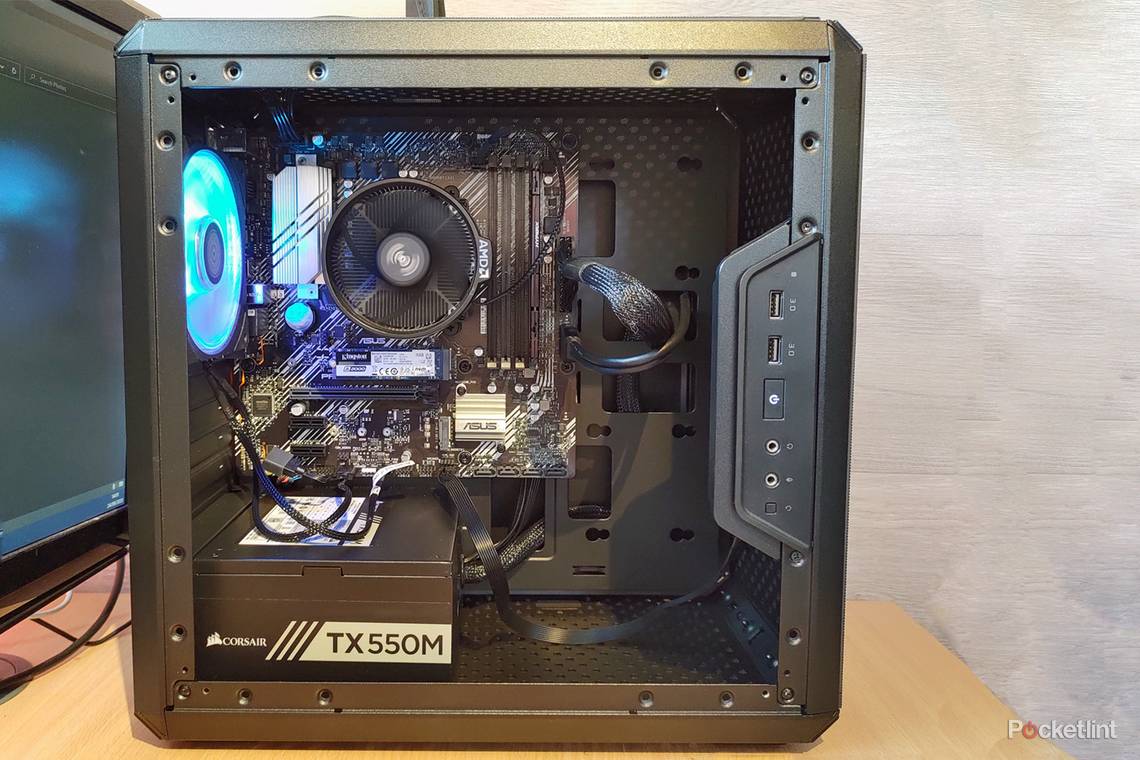
The PC that we have built isn't the cheapest it could be, but we'll explain those decisions as we go along.
What parts do you need for your build?
Here's a list of everything you need to get your build underway.

The motherboard
The motherboard is the heart of your PC, it ties everything together, it's the cornerstone on to which everything else is built. If you've not already noticed, we chose to build an AMD system and many looking for a slightly more affordable solution will do the same.
We've used the Asus Prime B550M-A (Wi-Fi) and there's a number of reasons for that. One of the main reasons is that it natively offers Bluetooth and Wi-Fi on the motherboard which not all do. That saves having a separate card for those wireless functions. Some might not want those features and that's a personal choice. Secondly it supports PCIe 4.0, allowing greater potential for future updates.
In AMD's range of microATX motherboards there are essentially three chipsets (at the time of writing): X570, B550 and A520. The X is the performance end and the A is the real budget end, so we're in the mid-range. Again, that's because we don't want to upgrade the motherboard too soon, and at the time of building, A520 had only just started to go on sale so availability was a problem.
The critical thing is that you buy a motherboard that meets your needs, supports the functions you want and above all, supports the CPU you're going to plug into it.

The AMD CPU
AMD Ryzen 5 3400G 4-core, 8-Thread Unlocked Desktop Processor with Radeon RX Graphics
As this is an AMD build, it's an AMD CPU that you need. This has to match the socket on the motherboard, in this case it's AM4. We chose the Ryzen 5 3400G. One of the principle reasons for choosing this CPU was that it's mid-range, because we wanted the power, but it also offers onboard Vega graphics.
This means that a GPU (graphics card) isn't necessary: the CPU will power the graphics and you can connect your monitor up to the motherboard and know you'll get something out of it. The reason we wanted onboard graphics was so that we could avoid the expense of a GPU at the time of the build - a GPU is easy to upgrade to later.
The CPU is one of the most expensive parts of the build, but AMD has alternatives if you want to go cheaper. You can opt for Ryzen 3 or Athlon CPUs, which both offer Socket AM4 compatibility and both with Vega graphics options too if you want to bring the price down.

A case for your computer
Cooler Master MasterBox Q300L Micro-ATX Tower with Magnetic Design Dust Filter, Transparent Acrylic Side Panel, Adjustable I/O & Fully Ventilated Airflow, Black (MCB-Q300L-KANN-S00)
The case may be one of the cheaper pieces you opt for, but there's huge variety out there. We opted for the Cooler Master Masterbox Q300L because it was around the right size and we liked the design. It allows you to hide the cables and has a clear panel in the side to show off the internals.
The important thing is that you get a case that will fit what you want in it. Many cases are designated as microATX so you know the motherboard will fit. The other major lump that you'll have to fit in is the power supply - the PSU - and in this case we can fit a full ATX PSU.
There are also plenty of options for cooling - which we don't need huge amounts of at this stage - while it's big enough to accommodate a decent size of graphics card in the future, should we choose to upgrade.
With cases you also get what you pay for and if you opt for a cheap case (like we did) then you have to accept that some parts might be a little crude.

The power supply
Corsair CP-9020133-UK TX550M 550 W 80+ Gold Power Supply Unit, Black
The power supply, or PSU, is one of the components that you don't really want to upgrade in the future, because that will mean removing all your wiring and that's potentially a lot of work. So that means you really need to use a PSU that's going to provide enough power for your system.
You can calculate this easily via an online calculator, but remember to include the sort of GPU you might want in the future.
There are loads of options from cheap to expensive, modular or not, as well as lots of power ratings and performance ratings. We opted for the Corsair TX550M which met our specifications. It's semi modular reducing the number of unused cables to hide in the case.

RAM
HyperX Fury 8GB 2666MHz DDR4 CL16 DIMM 1Rx8 Black XMP Desktop Memory Single Stick HX426C16FB3/8
Everyone talks about RAM - random access memory - and the important thing is that your RAM is supported by your motherboard. Here we're using 8GB DDR4 HyperX RAM.
The motherboard we're using will accommodate up to four sticks of RAM and it supports dual channel memory, where there are performance gains from using the sticks in pairs. To keep the price down we're starting with just one stick, but it's an easy upgrade to buy another stick of the same RAM when the next pay check comes in. Not all motherboards will support a single stick - so make sure you check the manual.

Storage
Kingston 250GB A2000 M.2 2280 Nvme Internal SSD PCIe Up to 2000MB/S with Full Security Suite SA2000M8/250G
The final essential thing you'll need is storage. This can range from a cheap mechanical drive up to expensive solid drives (SSD), but we're taking advantage of another motherboard feature here which is support for NVMe M.2 SSDs.
This is much faster than other drive types, it's compact and very easy to install on the motherboard, so it's an easy choice. We opted for a 250GB Kingston A2000 M.2 SSD because it was a good price. This is where Windows will get installed and booting from NVMe makes everything nice and fast.
It's also easy to add additional drives in the future, so if your budget is tight, you can start with a smaller capacity to keep the cost down and then add more storage when you have more money.
How to build you microATX PC
Once you've made your selections and they've been delivered to your doorstep, it's time to get into the actual building of the PC - the fun part.
There are some things to consider before you start:
- There will be spare cables and screws you don't need
- You'll need time if you've not built a PC before
- Keep the manuals to hand as there may be things to reference
- You'll need a screwdriver, but usually only a Philips
- Use an anti-static wrist strap
The first thing to do is setup your build area and make sure you're wearing the anti-static wrist strap. This will stop you discharging any static electricity you build up through the components. You'll need to clip it onto something that's earthed, like a radiator or pipe.
Make sure you have everything to hand and have all the essential components before you start building.
The motherboard
This is the best place to start as you want to have your motherboard setup before you get it into the case. It will likely come in an antistatic bag, and this is great to rest the motherboard on while you're working.
Motherboards can be a little scary because they are littered with connections, but things become obvious as you work - and the manual will show you what everything is, alongside the labels that will be on the board itself.
Installing the CPU
Yes, the first task involves two of the most important pieces. In the case of the AMD Ryzen 5 we're installing, we're not going to use the pre-installed clips on the motherboard for the cooling fan, so those need to be removed. The supplied cooling fan will screw straight into those holes instead, so you might as well remove those first to get them out of the way - if you're using a third-party fan, just check to see what's needed.
Installation of the CPU is fairly simple. It's held in place by a clamp that grips the pins on the underside. The first job is to lift the arm to release the clamp. You'll find this on the side of the CPU socket on the motherboard.

The CPU will slot in easily, and all you have to do is make sure that the gold triangle in the corner of the CPU matches the triangle marking on the motherboard socket. In this case, both are in the bottom left corner. The CPU then drops into place. Move the clamp arm down to clamp it and you're done. Your PC has a heart.
Installing the CPU fan
As this is a simple build with a simple fan, it's convenient to install it right after the CPU. That's because in this situation there's thermal paste applied to the fan already so it's best just to get it installed and out of the way.
The CPU fan will only fit one way and with a little comparing this will be obvious - as well as lining up with the screw holes we mentioned before. This fan also has the screws attached, so it's an easy installation.

Simply get it in the right place and tighten the screws to secure it. In this case the screws are also spring loaded to keep the pressure in the right place and avoid getting anything damaged.
The CPU fan also gives you the opportunity to hook up your first piece of wiring. The attached cable slots onto the CPU fan header (the sticky-up pins) on the motherboard. This will be clearly labelled, or check the manual to be sure.
Installing the RAM
RAM is easy to install: it only fits one way and the slots are easy to identify. But you'll remember we mentioned dual channel and multiple RAM slots before, so you might want to check the manual for the motherboard.
The manual will tell you which slots to use in which order; it will tell you which pairs to use first (if you're not using all four) and it will tell you which slot to use if you're only installing one stick of RAM.
Once you've located the correct slot and made sure the RAM is the right way round, push back the clips at the end of the slot and then push the RAM into the slot. It should fit easily and the clips should click back into place to secure the RAM.
Installing the NVMe drive
NVMe drives are so small and flat they take up almost no space, but the slot will often be covered by other elements, particularly if you're installing any other cards, so it's good to get this in place now while things are still clear.

The motherboard will have screw holes to support different lengths of NMVe and there should be screws to secure it in place. Once you've found these, you need to check the motherboard to ensure you're installing the drive in the correct slot. Some motherboards support different standards and so it's worth double checking before you install it.
Once you know where it's going, you simply push the drive into the slot and put the screw at the other end to keep it secure - easy.
Install the I/O plate
Now that the motherboard is loaded with parts, it's time to install it in the case. Make sure you've removed any spares from the case and lie it to down so you can see what you're doing.

The first thing you need to do is install the I/O plate on the back of the case. This is where connections will attach to the motherboard, for example Ethernet, USB or HDMI. The plate will come with the motherboard and it simply pushes into the case from the inside with a click. You'll notice that the I/O plate openings match the connections on the back of the motherboard.
All you really have to do is make sure it's the right way up.
Install the motherboard in the case
Most cases will accept several standards of motherboard and may have different screw holes. These should be labelled or highlighted in the manual. The motherboard is held off the case by mounting bolts and then secured with screws, all of which should come with the case.
Once you've located the correct holes you'll need to find the mounting bolts and put those in place. Some cases might have these preinstalled, or have some preinstalled. Once these are all in place, you're ready to move your motherboard into position.

The easiest way is to carefully offer the rear of the motherboard up to the O/I plate and get everything lined up and then let the motherboard gently sit on the mounting bolts. Some of these bolts might have an extra lip that the motherboard slots over, which will help to line it up.
Just check the I/O plate on the rear to make sure that you don't have any of the springs around the edges of the openings in the wrong place - like sticking into the sockets.
Once everything is in place, you just have to put in the screws to keep things in place. Once you've done that, you can connect the case fan cable to the fan header on the motherboard - again, check the manual to locate it. In our case we decided to replace the standard fan with an RGB fan just to make it a little more exciting - but that's added expense.
Install the PSU
The power supply unit - PSU - is one of the bigger lumps you have to install. Although the ATX format of PSU is standardised, not all cases are, so you'll need to check if you have to do anything special for it to fit in your case. For us, this involved screwing a mounting bracket onto the end of the PSU with four screws.
At this point it's probably easiest to stand the case back up again, but it depends on the case you're using. What you need to avoid is knocking the motherboard when you're installing the PSU as it's a pretty big lump. You also need to check which way up your PSU needs to be installed.
There will be a fan on the PSU and in most cases, this will point down, so that it blows hot air out the bottom of the case, rather than up towards your other components. But there should be ventilation in the bottom of the case for this. If it's just a metal plate, you'll have to install your PSU with the fan at the top.
From the inside, offer the rear of the PSU up to the opening in the case and again, secure it with the provided screws.
Connecting the PSU to the motherboard
The next step is a little more fiddly and this is might require you to keep the motherboard manual handy, although in a simple build, things are fairly simple.
There might be a mass of cables coming out of the PSU, but there are two important cables to power the motherboard and the CPU. These also have distinct connectors, so they are easy to identify and will be labelled.

At this point you will also want to consider where your cables are going to go. If the side of your case is clear, it's worth hiding the cables from sight, while also reducing the clutter around the components and ensuring the airflow is better.
Many cases will let you route the cables around the back and out of sight. It's worth taking some time to identify where you need to get which cable so you can route everything through.
The two major connectors you'll need are the 8-pin 12V power and the 24-pin connector. These are easy to identify and the plugs will only fit in one way round, with a clip to keep them in place.
Connect your front panel connections
Besides the connections on the rear of your case, there's likely to be connections on the front too. This will often include USBs and audio sockets - as well as the power button and other functions.
On the case we're using, there's a panel of connections already installed on the frame. The cables for these need connecting to the motherboard on the correct pins. This is where you'll need the manual to make sure you're attaching the right things in the right places - because there will likely be pins on your motherboard that you don't need to use.

The USB connections are pretty easy, as are the audio connections, but the connections for the standby button, power button and LEDs are a little more fiddly. Everything, however, should be labelled so you can match it using the manual for reference.
The first start
With all the hardware in place, it's time to connect your new PC to a monitor, keyboard and mouse, connect the power cable and switch it on.
The fans should spin and the BIOS (basic input output system) will load up on the monitor. Through the BIOS you can control many of the hardware settings for the PC, but in many cases you'll just want to leave things alone unless there's a specific change you need to make.
Once you're happy that everything runs, you can put the side panel back into place and install your operating system.

Installing Windows 10
Windows 10 Home 32 bit/64 bit English International | PC | USB Flash Drive
The easiest way to install Windows 10 is using Microsoft's own tool. You'll need a separate PC to do this, it will allow you to create a bootable USB drive that you can then use to install Windows 10.
You'll need a USB stick with at least 8GB of storage, but then the tool will help you easily create the bootable drive with a few clicks. Then it's simply a case of putting that USB stick into the new PC and restarting it. The drive should be detected and the Windows installer will start and walk you through the rest of the process.
If you run into a problem, like it says the media drive cannot be accessed which is a common fault, you might need to try another USB socket, or create another version of your bootable drive. Generally though, the process should be slick and easy.