Building your own gaming PC can be an intimidating, exciting, nerve-racking and rewarding experience. Crafting a machine on your own, with a selection of electronic parts is quite a thrill. It also allows you to make something that's personalised to you and built according to your own budget, specifications and preference.
Crafting a gaming PC can save you money over buying a pre-built machine from a retailer or allow you to create a monster gaming machine which will run games on ultra-settings for years to come. If you're looking to create something that can handle high-end gaming, video rendering and even streaming, then you've come to the right place.
We've put together the following guide to show you have to craft an extreme gaming machine including covering all the parts you'll need and why they're worth it.
|
Index |
|
Budgeting your extreme gaming PC
Before you can get started, you'll need to consider your budget. We're going into this assuming you've got a good wedge of cash burning a hole in your pocket and want to invest in some serious gaming power.
In our mind, it's always worth getting the latest hardware with a view to future-proofing of your system. It's counter-productive to spend all your hard-earned money on something that will simply need upgrading in a year or two.
The utter joy of building your own gaming PC is if you build solid foundations then you'll only need to upgrade a couple of parts every few years to keep your PC going and going for years to come.
It's worth spending extra on the core parts of the machine - the CPU and motherboard – as these are the foundation of the computer and much harder to replace and upgrade in future.
What components do you need?
Building your own gaming PC requires a number of different components. It's important to do your research and ensure you buy the correct parts for your PC and that they'll all work together. Certain specifications of each component will affect this and you need to be sure this is all correct before you even place your order.

Extreme gaming motherboards
Think of the gaming motherboard as the foundation of your extreme gaming PC. Though each of the components plays its part, none of them could function without the support of the motherboard. Each device within the PC connects to it to allow the computer to function.
Choosing the right motherboard for you will depend on other factors. It's essential to remember to thoroughly examine the specifications of your motherboard before you purchase other parts to ensure they'll not only fit, but also work with your system.
As our goal is to create an extreme gaming PC, we chose a motherboard to match. These high-end motherboards support masses of RAM, the possibility to install multiple graphics cards and much more besides.
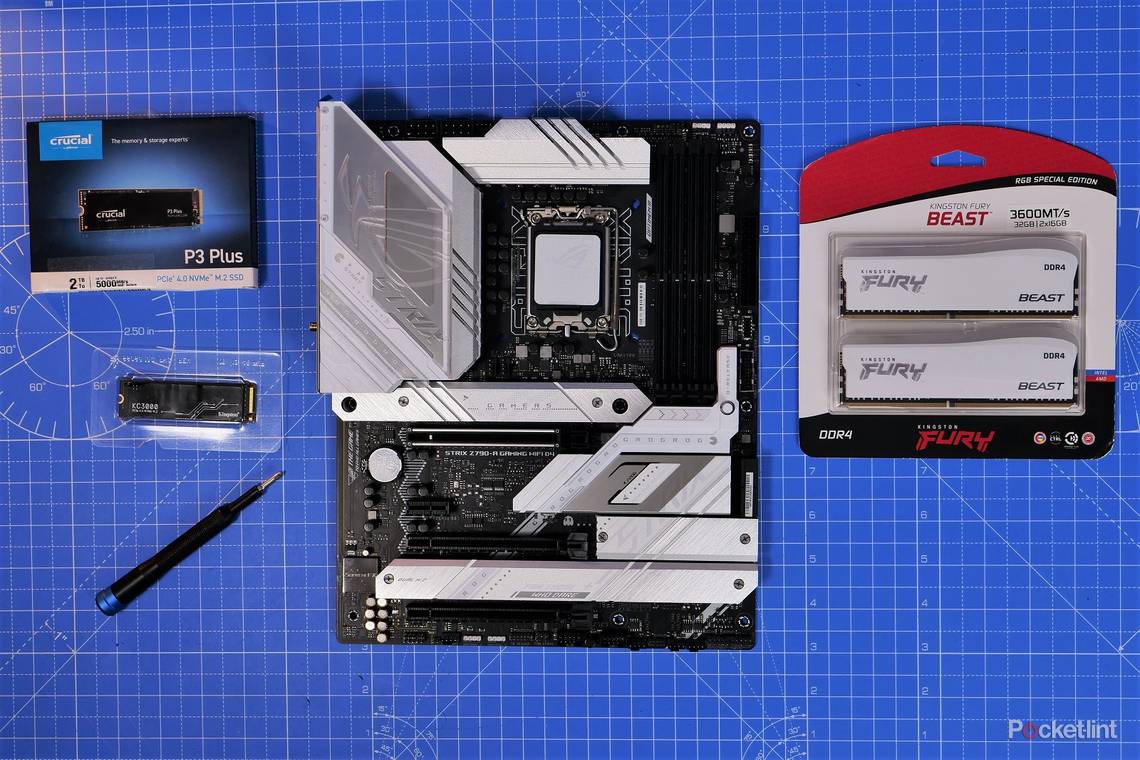
The motherboard we're using for this extreme PC build is the Asus ROG STRIX Z790-A GAMING WIFI D4. This motherboard supports the latest Intel CPUs but it also works with DDR4 RAM which means it's powerful but potentially more affordable. Saving you money on RAM that can then be spent on a graphics card instead.
Dual-channel simply means two sticks of RAM work in pairs on the motherboard. You should use two minimum, but you could fill all four slots with as much as 128GB of RAM total.
The RAM's frequency is measured in MHz. This motherboard is capable of taking RAM with a maximum frequency of 5333MHz. You need to ensure you buy RAM that fits in the right category.
This might all sound complicated but you just need to ensure you have the right architecture (channel, MHz, type and size) and it will work.

High-end Central Processing Units (CPU)
The Central Processing Unit (CPU), is the brain that powers your computer. It's another part that's important not to skimp on as it does a lot of the leg work for gaming, but also for other tasks like rendering videos and supporting processing for streaming if that's your plan.
There are two main manufacturers of CPUs - AMD and Intel. These manufacturers also make a variety of processors with different chipsets. In order to work out which CPU fits which motherboard you'll need to first pick the manufacturer and then work out how much money you have to spend.
Let's take Intel as an example. The current model of Intel CPU is the thirteenth generation of processors known as Raptor Lake.
These are the company's ultimate gaming processors with loads of power and overclocking potential. They also support PCIe gen 4 NVMe drives - which means faster loading speeds for Windows and your games.
These processors are socket LGA1700 - which means you need to ensure the motherboard you purchase can accept this socket type. Motherboards are also purposely sold as AMD or Intel compatible to make this easier for you.
At a basic level, the higher the number, the more powerful the processor. We have an Intel Core i9-13900K for this extreme gaming build on the basis that we want to create something that can handle anything you throw at it. This is the current flagship, but you could opt for something lesser like the i7-13700K if you wanted to save some money for elsewhere.
These high-end gaming processors are expensive but they're also incredibly capable. If you're planning on 4K gaming, streaming to Twitch and editing videos for YouTube then you won't be disappointed with the processing power here.
If you don't want to use the same processor as us, Intel has a handy tool to find the right CPU to match your motherboard or vice-versa.

Random Access Memory (RAM)
Kingston Fury Beast RGB Special Edition 16GB (2x8GB) 3200MT/s CL16 DDR4 Desktop Memory Kit of 2 | Infrared Syncing | Intel XMP & AMD Ryzen Ready | RGB CTRL Software | KF432C16BWAK2/16
RAM is the memory of the computer. In a gaming PC, it helps the computer to act quickly and efficiently as you game. The more RAM you have and the higher the MHz frequency the faster the computer can work.
With Intel's 13th generation CPUs you can now take advantage of DDR5 RAM but it's also possible to buy DDR4 motherboards too. DDR5 is newer and faster but also more expensive and not always as stable as DDR4. So it's worth considering these options when buying your motherboard and the RAM to go with it.
The size of RAM is measured in GB. For an extreme gaming PC, the more RAM the better, especially if you can afford high-frequency or overclockable RAM as well.
We'd suggest that you'll need at least 32GB of RAM for proper high-end gaming. This amount is really useful for streaming and content creation. You'd be surprised how much RAM is used when rendering videos. Plus let's not forget how RAM hungry Chrome can be!
The good thing about RAM is it's one of the easiest things to upgrade in a gaming PC. As long as you buy RAM that matches in terms of size, frequency and model number you can double the size in future. If you want to save money now, buy 16GB to start with, then upgrade with another 16GB in future.

Power Supply Unit (PSU)
The PSU is the beating heart of your extreme gaming PC. It supplies the power for all the parts in your machine. It's essential that you don't scrimp here as if the power supply goes wrong it could take a lot of other expensive parts with it.
All the parts of your build need to be plugged into it in order to run. The motherboard takes the majority of the power and supplies some of the other parts, but the graphics card, hard drives and fans will also need power.
You also need to choose a PSU which has enough power to run your machine and all the parts inside it. Power supplies are sold according to wattage, which is the amount of power they're capable of putting out. Generally speaking, the higher the wattage, the higher the price, but bigger isn't always better.
If you have a PSU that's too powerful it won't run as efficiently and may run up your electric bill. Too weak and the power supply simply won't give enough power to the parts which could see your machine turning off (or worse) in the middle of a game.
Luckily there's a handy calculator you can use to work this out - input all the components and use this to calculate the minimum wattage power supply you require. See what results it brings back and then choose something with a little more power to account for future devices you might add.
If you're planning on using the latest graphics cards from Nvidia, it's worth getting a powerful PSU as the high-end GPUs can use a lot of power.
Considering your storage options and requirements
There are a number of different options when it comes to storage for your machine. These are slightly different and vary in price as well as speed and storage size.
You may want lots of storage space to save photos, videos and install every game in your collection. Alternatively, you might only play one or two games and so load speed and lag reduction are more important. You could also mix and match the following options to maximise your system's storage.

M.2 NVME Drives
Kingston KC3000 PCIe 4.0 NVMe M.2 SSD - High-performance storage for desktop and laptop PCs -SKC3000S/4096G
These tiny things are the newest and best storage options for extreme gaming PCs. They're incredibly fast and offer ultra-quick transfer speeds. These NVMe drives offer several benefits. Install Windows and software on them and your machine will boot up in the blink of an eye. Install games and you'll shorten load times when you start a game and the wait between levels. They also reduce so-called "lag input" during gaming which can help improve your gaming prowess.
For comparison's sake, the standard traditional hard drive can handle about 500 MB/s a second while some NVMe drives manage 7,000 MB/s. This is also useful for transferring and editing 4K video files.
- How to improve your gaming performance with blazing fast NVMe SSDs
- Best NVMe SSDs: Our choice of the fastest and best storage drives you can buy
On modern gaming PCs these drives are a breeze to install. They often fit directly onto the motherboard. There are no cables to plug in, so they're dead easy to fit. The only downside is they're only currently expensive if you want large storage capacity.

Hard disk drives (HDDs)
Toshiba X300 6TB HDD
These disk drives are the cheapest storage option, but also the slowest. They offer larger capacity storage space for less money than other modern storage systems like Solid State Drives.
They are slower though, so you won’t feel the benefit when booting your PC or loading games. We still love including them in PC builds to back up photos, old videos and installing a mass of games from our Steam library.

Solid State Drives (SSDs)
Samsung Evo 860 Pro 1TB SSD
Classic Solid State Drives have no moving parts and can transfer files more quickly than traditional hard disk drives but not as quickly as NVMe drives. These drives are a middle ground between uber-fast NVMe drives and large capacity HDDs. You can find these drives with several terabytes of capacity to hold all your games with ease as well.

Graphics cards
Gigabyte GeForce RTX 3090 VISION OC 24GB Graphics Card
The graphics card is the component that does the majority of the workload when it comes to powering your games.
The newest graphics cards will run the latest games on ultra settings and support 8K while delivering decent framerates too. The result is incredible graphics that will leave you drooling over your keyboard. These devices do come at a hefty premium though and, besides the extreme CPU, they're likely the most expensive single component you will be adding to your machine.
Graphics cards are produced by three manufacturers - Nvidia, AMD and Intel. These vary in price and the power they deliver. We're aiming to create a high-end gaming machine, so the 40-series of graphics cards from Nvidia is the current pinnacle. These cards support RTX Ray Tracing and deliver stunning visuals across a variety of the most modern games as well as blistering gaming performance.
Another consideration might also be virtual reality. If you want to build a gaming machine that's capable of running VR then you'll need to be aware of the minimum system specifications of the HTC Vive Pro 2 or Pimax 8K.
Both these devices require a decent graphics card. It's worth paying for the extra graphical power to get the most out of VR.

CPU heatsink/cooling
NZXT Kraken Z73 RGB 360mm - RL-KRZ73-RW - AIO RGB CPU Liquid Cooler - Customizable LCD Display - Improved Pump - Powered by CAM V4 - RGB Connector - Aer RGB 2 120mm Radiator Fans (3 Included) - White
Cooling is an important part of any gaming PC, even more so with an extreme gaming PC that you're going to be putting through the wringer. The components in your case will also need to be kept cool, not least of which is the CPU.
Modern processors do a lot of work and get really hot when you're playing. Keeping them cool is essential - not only to prevent them from overheating and breaking but also to ensure the smooth running of the PC and uninterrupted gaming.
For this build, we used a NZXT Kraken Z73. This is a 360mm all-in-one liquid cooler that's quiet and able to deliver excellent cooling perfromance with a nice aesthetic that includes a display that can give you at-a-glance view of current system performance.

Gaming PC cases
Lian Li LI PC-O11 Dynamic EVO Snow White ATX Full Tower Gaming Computer Case - O11DEW
Computer cases are available in a range of different sizes, shapes, colours and with varying features. The type of case you buy will impact the build of your gaming machine.
The main difference is size. Cases are available in full-tower, mid-tower, ATX, micro-ATX, mini-ITC and more.
Larger cases also give more room for hefty graphics cards and masses of peripherals. A big gaming PC case also makes putting the machine together easier as you'll have more room to work, more places to hide cables, but most importantly loads of room for air to flow through the case.
Large cases also offer other features like more storage bays for hard drives and more space for case fans and heatsink radiators. In this instance, we're using a small but mighty Lian-Li O11 Dynamic Evo which is capable of supporting ATX motherboards and has plenty of room for cooling too. It's also modular and allows you to install in diffrerent ways with optional accessories to make it interesting.

Case cooling
Lian-Li UNI FAN SL120 Revolutionized Daisy-Chain 120mm ARGB Fan, White, 3-Pack
Most decent gaming PC cases come with a number of different case fans that are plugged directly into the motherboard and powered to keep the case cool. You also have the option of buying extra fans to maximise airflow, as well as adding RGB fans to add custom lighting to the design. If you're spending this much money, you might as well make it look awesome.
The case we're using has no fans included as standard, but we've chosen to use Lian Li's SL120 V2 fans to fill it. These are superb fans as they're easy to install. These fans clip together and only require one cable per group of fans to control both RGB and power via a dedicated controler included with the triple pack of fans.

Anti-static wrist strap or mat
One of the cheapest parts you'll buy. This is a strap that attaches to your wrist and you will use this while building your gaming PC. Static electricity that builds up in your body can fry electronics in your computer while you're building, so this is a worthwhile precaution. Getting this wrong could lead to accidentally frying incredibly expensive parts and leave you crying into your beer.
Thermal paste
Noctua NT-H2 3.5g, Thermal Computer Paste incl. 3 Cleaning Wipes (3.5g)
Thermal paste is another cheap but essential purchase. This is a cooling paste that goes between the CPU and the heatsink/cooling system. It helps with convection and cooling and ensures your PC will run as it should. Don't scrimp here, but you won't be spending the earth either. It's worth noting though, that NZXT's liquid cooling system comes with thermal paste pre-applied, making life much easier.

How to build your gaming PC
Once you've purchased all the parts and waited impatiently for them to arrive at your house, the real fun begins.
Putting the parts together can be a daunting experience, especially when building an uber gaming machine like this with expensive parts. With our help though, you'll find it's relatively easy and once it's all done you'll have an awesome gaming machine that you created yourself. This is an incredibly satisfying experience and you'll probably be hooked afterwards.
Before we dive into the nitty-gritty, there are a few things to remember which will help the build go more smoothly:
- PC building usually ends up with an excess of wires/cables, screws and parts that you don’t need. Don't panic if this happens.
- Complete PC builds may include cables that don't connect to anything and this might not be a problem. Again, don't panic.
- Use an anti-static wrist strap at all times to avoid destroying electronic parts.
- Don't start cable tying until the very end, in case you have something in the wrong place that needs to be moved.
- If the case has protective stickers on it, leave them on until the end to avoid accidental scratching while you're building.
- Keep all instruction manuals handy so you can easily reference them while you work.
- Keep any screws you remove in a logical place so you know where they are when they need to go back in.
To show you how to build your own gaming PC we're going to talk through each step of the build and how to put it together. This will vary slightly depending on the parts you're using, but will mostly require the same steps.
For this build we used the following components:
- Motherboard - Asus ROG STRIX Z790-A GAMING WIFI D4
- CPU - Intel Core i9-13900K (socket LGA1700)
- Case - Lian Li Dynamic Evo
- RAM - Kingston FURY Beast RGB SE 32GB RAM
- CPU cooling - NZXT Kraken Z73
- M.2 NVMe drives - Kingston KC3000
- HDD - Toshiba 6TB high-performance hard disk drive
- SSD - Samsung Evo 860 Pro SSD 1TB
- PSU - Corsair HX1500i PSU
- GPU - Gigabyte RTX 3090 Vision OC
- Fans - Lian Li SL120 V2 Uni Fans
Other things you'll need:
- Time - if this is your first build it can take as much as a day or two to do it correctly and get your PC up and running. Don't rush.
- Screwdrivers - most parts require a Philips head screwdriver to install.
- Anti-static wrist strap/mat
- Thermal compound
Getting started with your PC build
To start off unbox your case, remove any extra cables and bits that came with it, then set it to one side.
Try to avoid building in a room with carpet and make sure you wear the anti-static wrist strap throughout the build process. We find an ESD mat is a good tool as these plug into a grounding point and keep you earthed, therefore removing the danger from precious components.
Make sure you have plenty of space, including a large flat area to move the machine about. Sometimes you'll be laying it down, other times you'll be working with the case stood up straight.

Installing case fans
This part will vary depending on the case you're using and your personal preference. We're using a Lian Li Dynamic Evo case that comes with no fans as standard, but enough room for liquid cooling setup including radiators and/or a mass of fans.
Extra fans are always worthwhile on an extreme build. Extra airflow helps keep your machine running cool and more efficiently, meaning better performance and superior gaming.

This case has fan brackets both on the top and bottom of the case. They're held in place with thumb screws and small screws. Take them out and then install the fans on the bracket.
For the fans on the bottom we'd recommend installing them so the back of the fans face up into the case. This pulls cold air into the case and helps keep the GPU cool.
These fans clip togetrher easily, so clip three together, then position the fans so the cable will point towards the back of the case.
Installing the exhaust fans
We've set the fans at the bottom of the case to pull cold air in. Now we need to set some to exhaust in order to blow hot air out. After all, components like the graphics card, CPU and more will generate high that needs to be removed from the case to keep it running efficiently.
We know hot air rises, so we're installing three fans at the top of the case to suck hot air out. We're also installing one at the rear as well.
These fans are mounted face down, again taking care to face the cables towards the rear of the case. It's possible to daisy chain the fans together or to run connectors to the rear to the controller. You need one controller for this build and that's able to power 16 fans total, with four fans in a group per connector.

Installing the Power Supply Unit
Installing the power supply will be slightly different from case to case. On this Lian Li case it can be neatly tucked away out-of-sight and out of mind in the rear. This is a dual-chamber case which means it's basically split in half.
Here is where the SDDs, HDDs and PSU are installed.
As standard you install the power supply at the bottom of this case.
Take the power supply out of its box. With this Corsair PSU, you'll find the standard power cables and the mains power plug. There's a large fan on it, this mounts facing outwards with the mains power facing the rear and the internal plugs facing the front of the machine.
We'd highly recommend working out which cables you need and plug those in before you start.
For the build we're carrying out you need to connected:
- 24-pin motherboard power supply cable
- Two 8-pin CPU power cables
- Two 8-pin PCIe GPU power cables
- A SATA power cable
These power cables are are marked both on the cable and on the power supply, so you can easily work out where to plug them in.

Doing this beforehand makes it far easier to manage the cables and the sapce at the back of the case.
Put the power supply on the mini shelf at the rear of the case and push it against the back of the case. It should line up so several screw holes showing where there are appropriate holes on the case for attaching it. The relevant screws are included in the case box.
Once the power supply is in, you'll be able to install all the cables later on.

Setting up the motherboard
Take your motherboard out of its box and remove it from the anti-static plastic bag it comes in. We find it's a good idea to use this as a mat to lay the motherboard on top on so it doesn't touch or scratch anything underneath while you work.
Ensure the motherboard manual is easy to access - it's very handy to reference, especially when it comes to plugging cables into the right places.
It's a good idea to read through this first to get an idea of where everything is and what plugs in where.

Installing the CPU
The CPU is one of the easiest components to install, but you do need to take care doing so. Forcing the processor into the motherboard can result in damaged pins and a broken CPU.
Position your motherboard in the same way we have in the photos. Look closely at the housing and you'll see a small arrow in one of the corners of the socket where the CPU sits. If you look at the CPU itself, you'll see a tiny little gold arrow pointing down to one of the corners. Most of the time, that arrow points to the bottom left of the socket, so that's where it'll go.
The next step is to remove the protective cover from the motherboard. This is clearly labelled and covers the slot for the CPU. Lift the lever arms to release the shielding and pop the cover off. Note how the lever fits as this is how the CPU will be held securely in place.
Place the CPU in with the arrow in the correct corner and gently slot it into place. There's no need to force it, the arms will do that for you as will the pressure from the heatsink.
Now that's done, drop the metal cover and put the lever back down.

Seating the RAM
The next job is installing the RAM. We're putting two sticks of RAM into two different slots on the motherboard. You'll see from markings on the motherboard and instructions which slots you need to fill. In this case, A2 and B2 are the first slots to install.

First, push the clips down at the edge of the slots, this unlocks them ready for the RAM sticks. Next, take the RAM out of its box and line it up with the correct slots. You'll see how it should fit in fairly easily. As you push the RAM in, the clips at the ends of the slots that will make a satisfying click when it is fully inserted. Don't force it or use too much pressure or you could risk damaging the RAM and the motherboard.
Note - you'll need to activate the XMP profile within the motherboard's BIOS settings to make the most of your RAM's maximum frequency. See the motherboard manual for instructions on how to do this.

Installing the M.2 NVMe SSD
Alongside the RAM, the M.2 SSD drive is one of the easiest things to install. These drives get power directly from the motherboard and transfer data that way too, so there's no need for pesky cables.
On this motherboard, there are four slots for M.2 NVMe drives. The location of these slots is fairly obvious too as they're located under heatshields. You'll need to unscrew this shield from the motherboard by removing the appropriate screws.
These slots are capable of holding PCIe gen 4 and gen 5 drives.
With the cover off you can install the drive. The drives slot in easily and this motherboard has a convenient clip to hold it in place too.

Be sure to remove the plastic film covering the thermal pads before installing.
We used several NVMe drives on our extreme PC build and we'd recommend doing the same too. You can use one for Windows, one for games and one for other things - video, photos, game captures, whatever floats your boat. Because they're smaller than traditional hard drives, they're easier to fill up so it's worth having a few.

Installing the CPU cooling bracket
The cooler we're using requires the mounting of a backplate and stand off screws.
It's easier to install these beforehand. This motherboard works with both LGA 1200 and LGA 1700 brackets and stand offs. Position the Intel backplate at the rear of the motherboard and push it through the holes surrounding the CPU. Then use the stand off screws to hold it in place and prepare for the cooler.

Preparing your case
You've now done nearly everything you can easily do outside the case, so it's time to move onto the main business of fitting it all in the case.
Take your case out and lay it flat so you can see the inside easily. You should find some stand-off screws inside the motherboard case. These can be used to fit the motherboard.
On this case, these stand-off screws come pre-installed but that might vary from case to case. There are several screws that essentially act as the bottom half of the screws you'll be installing to hold the motherboard in place. The stand-off screws ensure the back of the motherboard doesn't fit flat against the back of the case.
Different sized cases take different sized motherboards so the layout and number of stand-off screws might differ but the principle is the same. It's worth noting that this case can take various different sized motherboards, so fitting might vary.
How to install the motherboard
To install the motherboard simply line it up with the hole at the back of the case and the stand-off screws. We find the best way to do this is to lower the motherboard into the case at a slight angle with the ports pointed down towards the holes they'll be going into first.
As we mentioned earlier it's easiest to do this when the top fans aren't installed as you have more room manoeuvre.
Put the motherboard in at an angle and then lower it gently down onto the stand-off screws. This should result in you being able to see the holes of the stand-off screws through the holes on the motherboard. These holes will be shown on a diagram within the motherboard manual. They're also easily identifiable by the small silver dots around the outside of them.
Use the supplied screws to put the correct amount into the holes and tighten the motherboard securely onto the case without overtightening.
CPU cooler installation
For this process we're installing fans on the NZXT Kraken Z73 but we're using the Lian Li fans in place of the NZXT ones. Interlock the fans as before, then use long radiator screws to mount them face down on the radiator. Take the clips off the end of the fans before hand so they're easiler to install.
We'd also recommend using the cable that comes with the single fans, so you can connect the fan power to the breakout cable on the Kraken Z73 pump head. Then the RGB cable connects to the Lian Li controller. That way the fans are still controlled by the cooler.

You can then mount the radiator by using the small screws to attach it to the rear of the case.
Once that's done, seat the CPU pump down ontop of the CPU. It sits with the clips around the stand offs you installed earlier, then use thumb screws to secure it to the motherobard. There are several cables that come out of the pump that need connecting. Install the USB cable to the pump head and then to the motherboard (at the bottom).
The other cables include a power cable that you need to connect to either the CPU fan header or AIO pump header on the motherboard. There's also a flat power connector for SATA power that needs to connect to your PSU.
Installing standard Solid State Drives and HDDs
Now you can install the other hard drives in the machine. This is an easy process.
You can install 2.5-inch SSDs and 3.5-inch HDDs in this case.
To install SSDs, the easiest way to do it is to install them on the back of the panel that also acts as a cable shield at the rear of the case. This panel can be unscrewed and removed to fit two drives on it.
These types of drives need to be powered by a single SATA power cable from the PSU and then attached to your motherboard using the supplied cable. There are two types of cable supplied with the motherboard - one that's flat at both ends and another that's flat one end and bends 90-degrees at the other.
Standard platter-based hard disk drives are installed in the caddy that in turn slots into bays in the top rear of this case. Unscrew a thumb screw at the rear and you can pull these caddies out. Then install the HDDs by screwing them in using the screws that came with the case.
Slot the caddy back in and push until you hear a click, then replace the thumbscrew.
Like SSDs, these hard drives need SATA power (flat power connectors) and a connection to your motherboard as well.
Attach front-panel connectors
Every case has front-panel connectors of one sort or another that need to be connected to the motherboard in order to work. These include things like USB cables, audio cables (3.5mm headphone and microphone jacks), power buttons and more.
These need correctly connecting to the motherboard. This is where the manual comes in really handy. Each cable is clearly labelled in the case manual as to what it is and in the motherboard manual as to where it should plugin.
This Lian Li case has multiple connections it has four USB Type-A ports, a USB-C, HD audio, rest and power buttons and RGB lighting too. The Asus motherboard we're using has the connections we need for those ports, but not all motherboards will.

Corsair 30cm White Premium Braided Sleeved Front Panel Extension Kit
Optional - To improve the look of the front of the case you can use Corsair's Premium Sleeved Front Panel Extension Kit 30cm in white. These are mini cables that simply plug into the standard ones and feed through to the front. We love these as they give you more length to work with and mean you can see more brilliant white cables in the front of the case.

Installing the graphics card
To install the graphics card you'll need to find the correct PCIe slot on the motherboard. On this motherboard, there are several PCIE_X16 slots to choose from. If you have just one card it's best to use the top spot.
Looking at the graphics card, you'll find the connectors that fit into this slot are on one side and require you to install the graphics card with its fans facing down towards the bottom of the case.
Before you slot it in you need to remove the cover from the rear of the case. This is a strip of metal held in place with a thumbscrew. You'll need to remove two of these in order to fit the connectors through the back of the case so you can plug them into a monitor.
Now you can put the graphics card into the slot. Line up the connectors with the holes. You'll note there is a small one next to a longer one, so it's impossible to install this component incorrectly, but don't force it. Like when fitting the RAM, you'll note a clip at the end of the slot, this will click when the GPU is fully installed.
Once the graphics card is slotted into the motherboard, you can screw the thumbscrews back into the holes - through the metal plating on the back of the graphics card - this will help hold it in place.

Attaching and connecting power supply cables
This next stage is where things can get messy and fiddly - plugging in all the power cables. The more components you have in your gaming PC, the more cables need to be plugged in. It should be relatively straightforward, but keeping the cables neat can be difficult.
For SSD and HDD power you'll find cables and slots on the PSU marked "peripheral & SATA" these have thin, flat connectors on them that plug into hard drives. You'll find you have cables with multiple connections on them - you can plug several hard drives into this and anything else that needs SATA power (lighting controllers for example).
The Nvidia RTX 3090 graphics card also requires power and uses two 8-pin PCIe power cables. These can be fed through from the rear of the case and feed through neatly along the side.
Make sure you connect all the cables you plugged in earlier to the PSU.
Cable tidying
Now your build is nearly finished you can try to tidy up a bit and make sure everything is neat and tidy. This isn't just about being obsessively neat - tidy cables also help with airflow in the case and help keep your components cool. It's worth spending time on.
Before you start, we'd recommend double-checking everything is plugged in - check the motherboard manual and ensure all the inputs are connected as they should be. We'd also recommend plugging your PC into the power socket and powering it on. Don't touch the insides while you do this.

The Asus motherboard has a set of LEDs which shows warning codes if things aren't going smoothly, you can see what these codes mean by looking in the manual. If it doesn't work first time, don't panic it might be something simple - maybe RAM isn't seated properly or graphics card doesn't have power.
If it all works, turn off and unplug the PC, then begin the fun of tidying the cables. You should find cable ties in both the motherboard box and with the PSU. Loop cables together and tighten them up so they're held neatly together.

Starting your machine for the first time
Now your first gaming PC is built. Congratulations! But it's not all over yet. You need to install Windows, some games and other software then get to the actual fun of playing games while bathing in the glory of having hand-built your own machine.
Hopefully, you've already seen our guides on the best gaming mice, headsets and keyboards to buy and you've got yourself equipped with those and a shiny new monitor to plug into your gaming PC.
You're going to need to plug those in to get started with the next bit.
- Best gaming mice: The best wired, wireless and RGB gaming mice to buy today
- Best PC gaming headsets: The best wired, wireless and surround sound headsets around
- Best gaming keyboards: The best quiet, loud, colourful and proud mechanical keyboards around
You'll also need another PC or laptop in order to install Microsoft Windows.

How to install Microsoft Windows
Installing Windows 10 is relatively straightforward. You'll need a few things first though:
- A purchased licence key for Windows 10 Home or Windows 10 Pro.
- A USB thumb drive or DVD (note this requires a DVD drive in your build, which we haven't done) with at least 8GB of free space
- Access to the Windows Installation Media tool
Using the Windows Installation Media tool you can turn your USB stick into a bootable drive - this means you'll be able to run the Windows installation program directly from it.
Run the tool, follow the instructions and install it on your USB stick using another PC. Once that's done, plug it into your freshly built PC and turn it on. You'll need to then press DEL as soon as the computer starts up and enter the BIOS. From there, look for the boot menu - this is an order through which the computer tries to load and select the USB drive you've plugged in as the first drive to try. This means when you exit - save the changes and reset - the machine will then load from the USB drive and prompt you to install Windows.
If you don't have access to another PC or laptop then you can buy a physical disc of Windows, but you'll also need to install an optical DVD drive in your PC. Borrowing a friend's computer is an easier option.
Once you've done this the tool will talk you through installing Windows - choose 64-bit and the hard drive you want to install on. Installing on an M.2 drive or SSD will mean Windows loads more quickly every time you turn your PC on.
After a while, you'll be asked to enter the license key and then the install will carry on. Your PC will eventually load Windows and then you'll be away! You'll need to plug in your Wi-Fi aerial or ethernet cable to connect to your home broadband, but then you can start downloading games and setting your PC up the way you want it.
It's worth noting, if you're using the same motherboard as us, we had a problem during Windows installation that can be fixed using this method.
Upgrading your PC in future
As we said earlier, once you've completed a build your PC should serve you well for years to come, but you can also upgrade it by adding various parts. The easiest upgrades are extra RAM and a new GPU. You can also add another hard drive fairly easily if you need more storage. RGB lighting and fan upgrades also make your machine look more snazzy.
Special thanks to Kingston, Lian Li, Intel and Asus for the support provided in creating this article.