When Google launched the Pixel 6, it also released a new camera feature called Real Tone. The idea being that it would offer a more natural result for a number of different skin tones.
Google felt that - a lot of the time - photos of people with skin colours other than white, regardless of darkness and shade, would often not look as they should. Often times looking contrast-heavy and washed out, or featuring a green tint.
With Real Tone, the idea is that the skin looks naturally lit, and closer to how the skin looks to the naked eye. It was initially an exclusive Pixel feature, but now Google has rolled the feature out to Google Photos on Android, iPhone and on desktop.
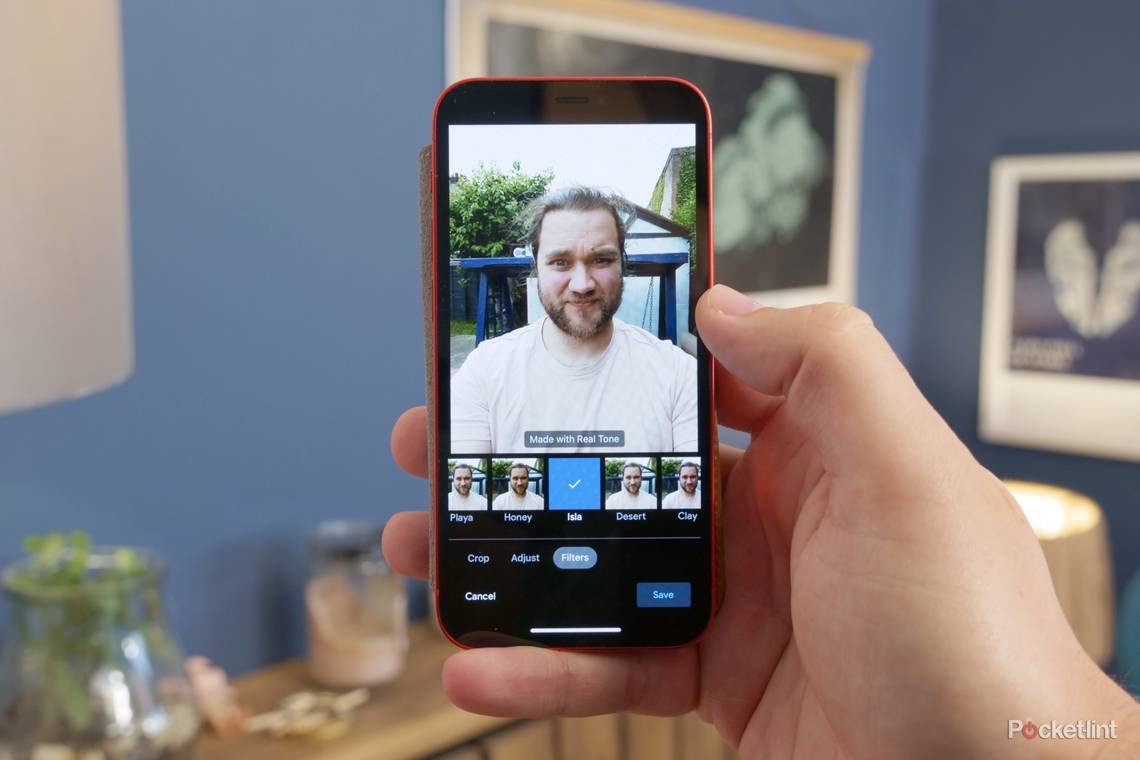
There are five new Real Tone-powered filters called Playa, Honey, Isla, Desert and Clay. Here's how to use them on all of your devices:
How to use Google Photos' Real Tone on Android
Despite it being a Google platform, you may find it takes a little while for the update to appear on your Android phone, however, once you have the updated version of Google Photos installed, follow the steps below:
- Open the Google Photos app
- Choose the selfie/portrait you want to apply the filter to
- Tap 'edit' in the toolbar - it looks like three sliders/faders
- Swipe across the bottom bar on the next screen until you see 'Filters'
- Select 'Filters' and now choose one of the Real Tone options: Playa, Honey, Isla, Desert or Clay
- Tap on the filter again to adjust the strength
- Tap 'adjust' to fine tune any other picture properties
It's a very simple process to go through if you're not happy with the way your skin tone results from your smartphone camera.
How to use Google Photos' Real Tone on iPhone
First ensure you have the latest version of Google Photos installed on your iPhone. We saw the feature appear in version 5.92, but if you check the App Store for updates, you should see it there available to download.
- Open Google Photos app
- Choose the selfie/portrait you want to apply the filter to
- Tap the edit icon in the bottom bar, it looks like three sliders/faders
- Choose 'Filters' from the options at the bottom of the screen
- Now choose either Playa, Honey, Isla, Desert or Clay
- Tap on your chosen filter again to adjust the strength
- Tap 'adjust' to fine tune any other picture properties
That's about as simple as it gets for editing.
How to use Google Photos' Real Tone on desktop
Of course, you can just access Google Photos from your web browser from a Windows, Mac, Chrome OS machine just by heading to photos.google.com. Next follow these steps:
- Open the selfie or portrait you want to apply the filter to
- Tap the 'Edit' icon which looks like a three slider control
- It should choose 'Colour filters' as the default next stage, if not, click on it in the top left of the sidebar
- Now choose one of the Real Tone powered filters: Playa, Honey, Isla, Desert or Clay
- Adjust the slider to increase or decrease the intensity of the filter
Of course, as with the mobile apps, you can fine tune the brightness, contrast and saturation by tapping the 'basic adjustments' slider icon at the top as well.