Apple's Mac ecosystem is a really nice one, especially if you're all in and have an iPhone, Apple Watch or other Apple devices to loop into your system. It can sometimes be a little confusing for those who are new to Apple to work out how basic things are done, though. One example is taking a screenshot or screen snip.

How to take a screenshot on the iPhone SE
Here is how to take a screenshot on the iPhone SE (2020), iPhone SE (2022), or any other Touch ID iPhone, like the iPhone 6, 7 or 8.There are two main ways to take a screenshot on a Mac -- with the Screenshot app or by using keyboard shortcuts. The process using the Screenshot app is easier to remember and also houses additional options like screen recordings. The keyboard shortcuts, on the other hand, tend to be faster. We'll guide you through how to take screenshots on a Mac along with helpful tricks you can do with that resulting snip.

How to take a screenshot on a Mac using the app
On every Mac, there's an app literally called Screenshot that can handle all of your snipping and screenshot needs, as well as letting you record your screen or a portion of it. Using the Screenshot app gives you clear options over using keyboard shortcuts, although once you learn the keyboard shortcuts, you'll forget all about the app because it's so much quicker to press a couple of keys. That said, let's take a look at all the different ways to take a screenshot on your Mac.

To take a screenshot on Mac using the built-in app, you'll first need to know where to find and open it. There are a few different methods:
- You can press Command + Shift + 5 if you want to get used to keyboard shortcuts right away.
- You can use the Spotlight tool (press Command + Spacebar to launch it) then search for Screenshot and open the app.
- You can open the Finder app then go to Utilities and double-click on the Screenshot app.

After opening the Screenshot app, a small toolbar will appear on your screen, providing you with various screenshot tools and options. You can click and drag the toolbar around your screen if you need to get it out of the way, for example. If you're unsure what each button does, hover your mouse over each icon, and you will see the name of each option. Here's a quick rundown of what each tool does once you click on it:
- Capture Entire Screen: This captures your entire screen -- if you have multiple apps on the screen, it will capture all of them. This is also the option that you want if you want to include any open menus or pop-ups along with the rest of the information on the screen.
- Capture Selected Window: This captures only one window. If you have multiple apps open but only want a screenshot of one, choose this option. You can also use this option to take a screenshot of just the menu or exclusively a pop-up window.
- Capture Selected Portion: Commonly referred to as the snip tool on a Mac, this option allows you to draw a box around the portion of the screen that you want to capture, instead of the entire screen or window. Choose this one when you don't need the entire screen recorded.
- You'll also see two icons for screen recordings -- these are videos rather than screenshots, which we'll discuss in detail below.

When you click on any of the respective icons, the Screenshot app behaves accordingly. Here's what you can expect for each option:
-
For Capture Entire Screen or Capture Selected Window, hover the mouse over the screen you would like to capture -- the cursor will turn into a camera icon -- click your mouse or touchpad to trigger it.
- Click the Capture or Record button on the toolbar for the respective options.
- After clicking, your screenshot will by default be saved to the desktop. You may also see a preview of the image in the bottom right corner -- you can click and drag on this thumbnail and place it in an open document, a message or email.
- Or, you can click on it to open the file and see the macOS Markup tool to draw or write on it with a digital pen, further edit and then share it.
- To get the thumbnail preview off your screen, swipe right on the touchpad or wait a few seconds, and it will disappear on its own.
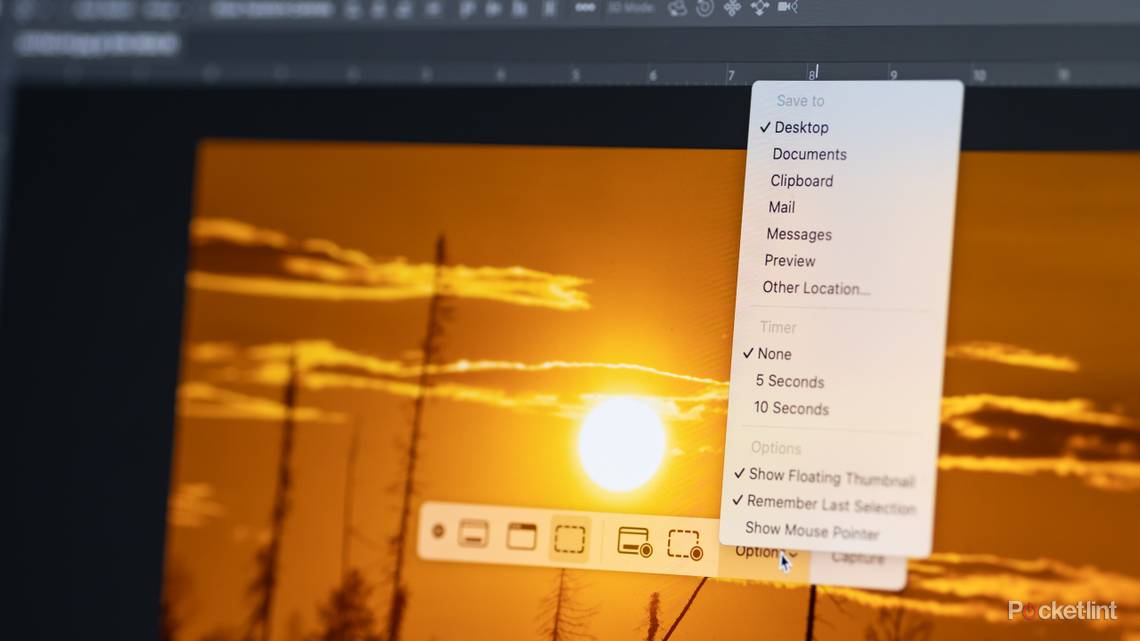
Optional: Use the Options drop-down menu to adjust your preferences. Here, you can choose where to save the resulting file and whether a preview of the image hovers in the corner of your screen after taking the screenshot.
 How to take a screenshot on a Mac using keyboard shortcuts
While using the Screenshot app is straightforward and easy to remember, macOS's keyboard shortcuts are the fastest way to take a screenshot.
- Shift + Command + 5 will open up the Screenshot app.
- Shift + Command + 3 will take a screenshot of your entire screen.
- Shift + Command + 4 will take a partial screenshot, turning your mouse pointer into a crosshair to select your area of choice. Move your mouse to one corner of what you would like to capture, click, then drag until you've selected the desired area. Once you let go of your mouse, the screenshot is captured.
- To take a screenshot of a specific window, a menu item, or a pop-up window, press Shift + Command + 4, then, once your cursor changes to the crosshair pointer, press the space key. Move your mouse to the window, menu, toolbar or pop-up window that you'd like to capture and click on it.

Best MacBook laptops: Expertly tested and ranked
MacBooks are powerful machines that professionals use to get work done. Here are the best ones available now.
 How to screen record on a Mac
While you can easily take a photo of your screen on a Mac using just keyboard shortcuts, to take a video of your screen, you'll need to use the Screenshot app.
- Use the search tool in the corner and type in Screenshot, or use Shift + Command + 5 to open the app.
-
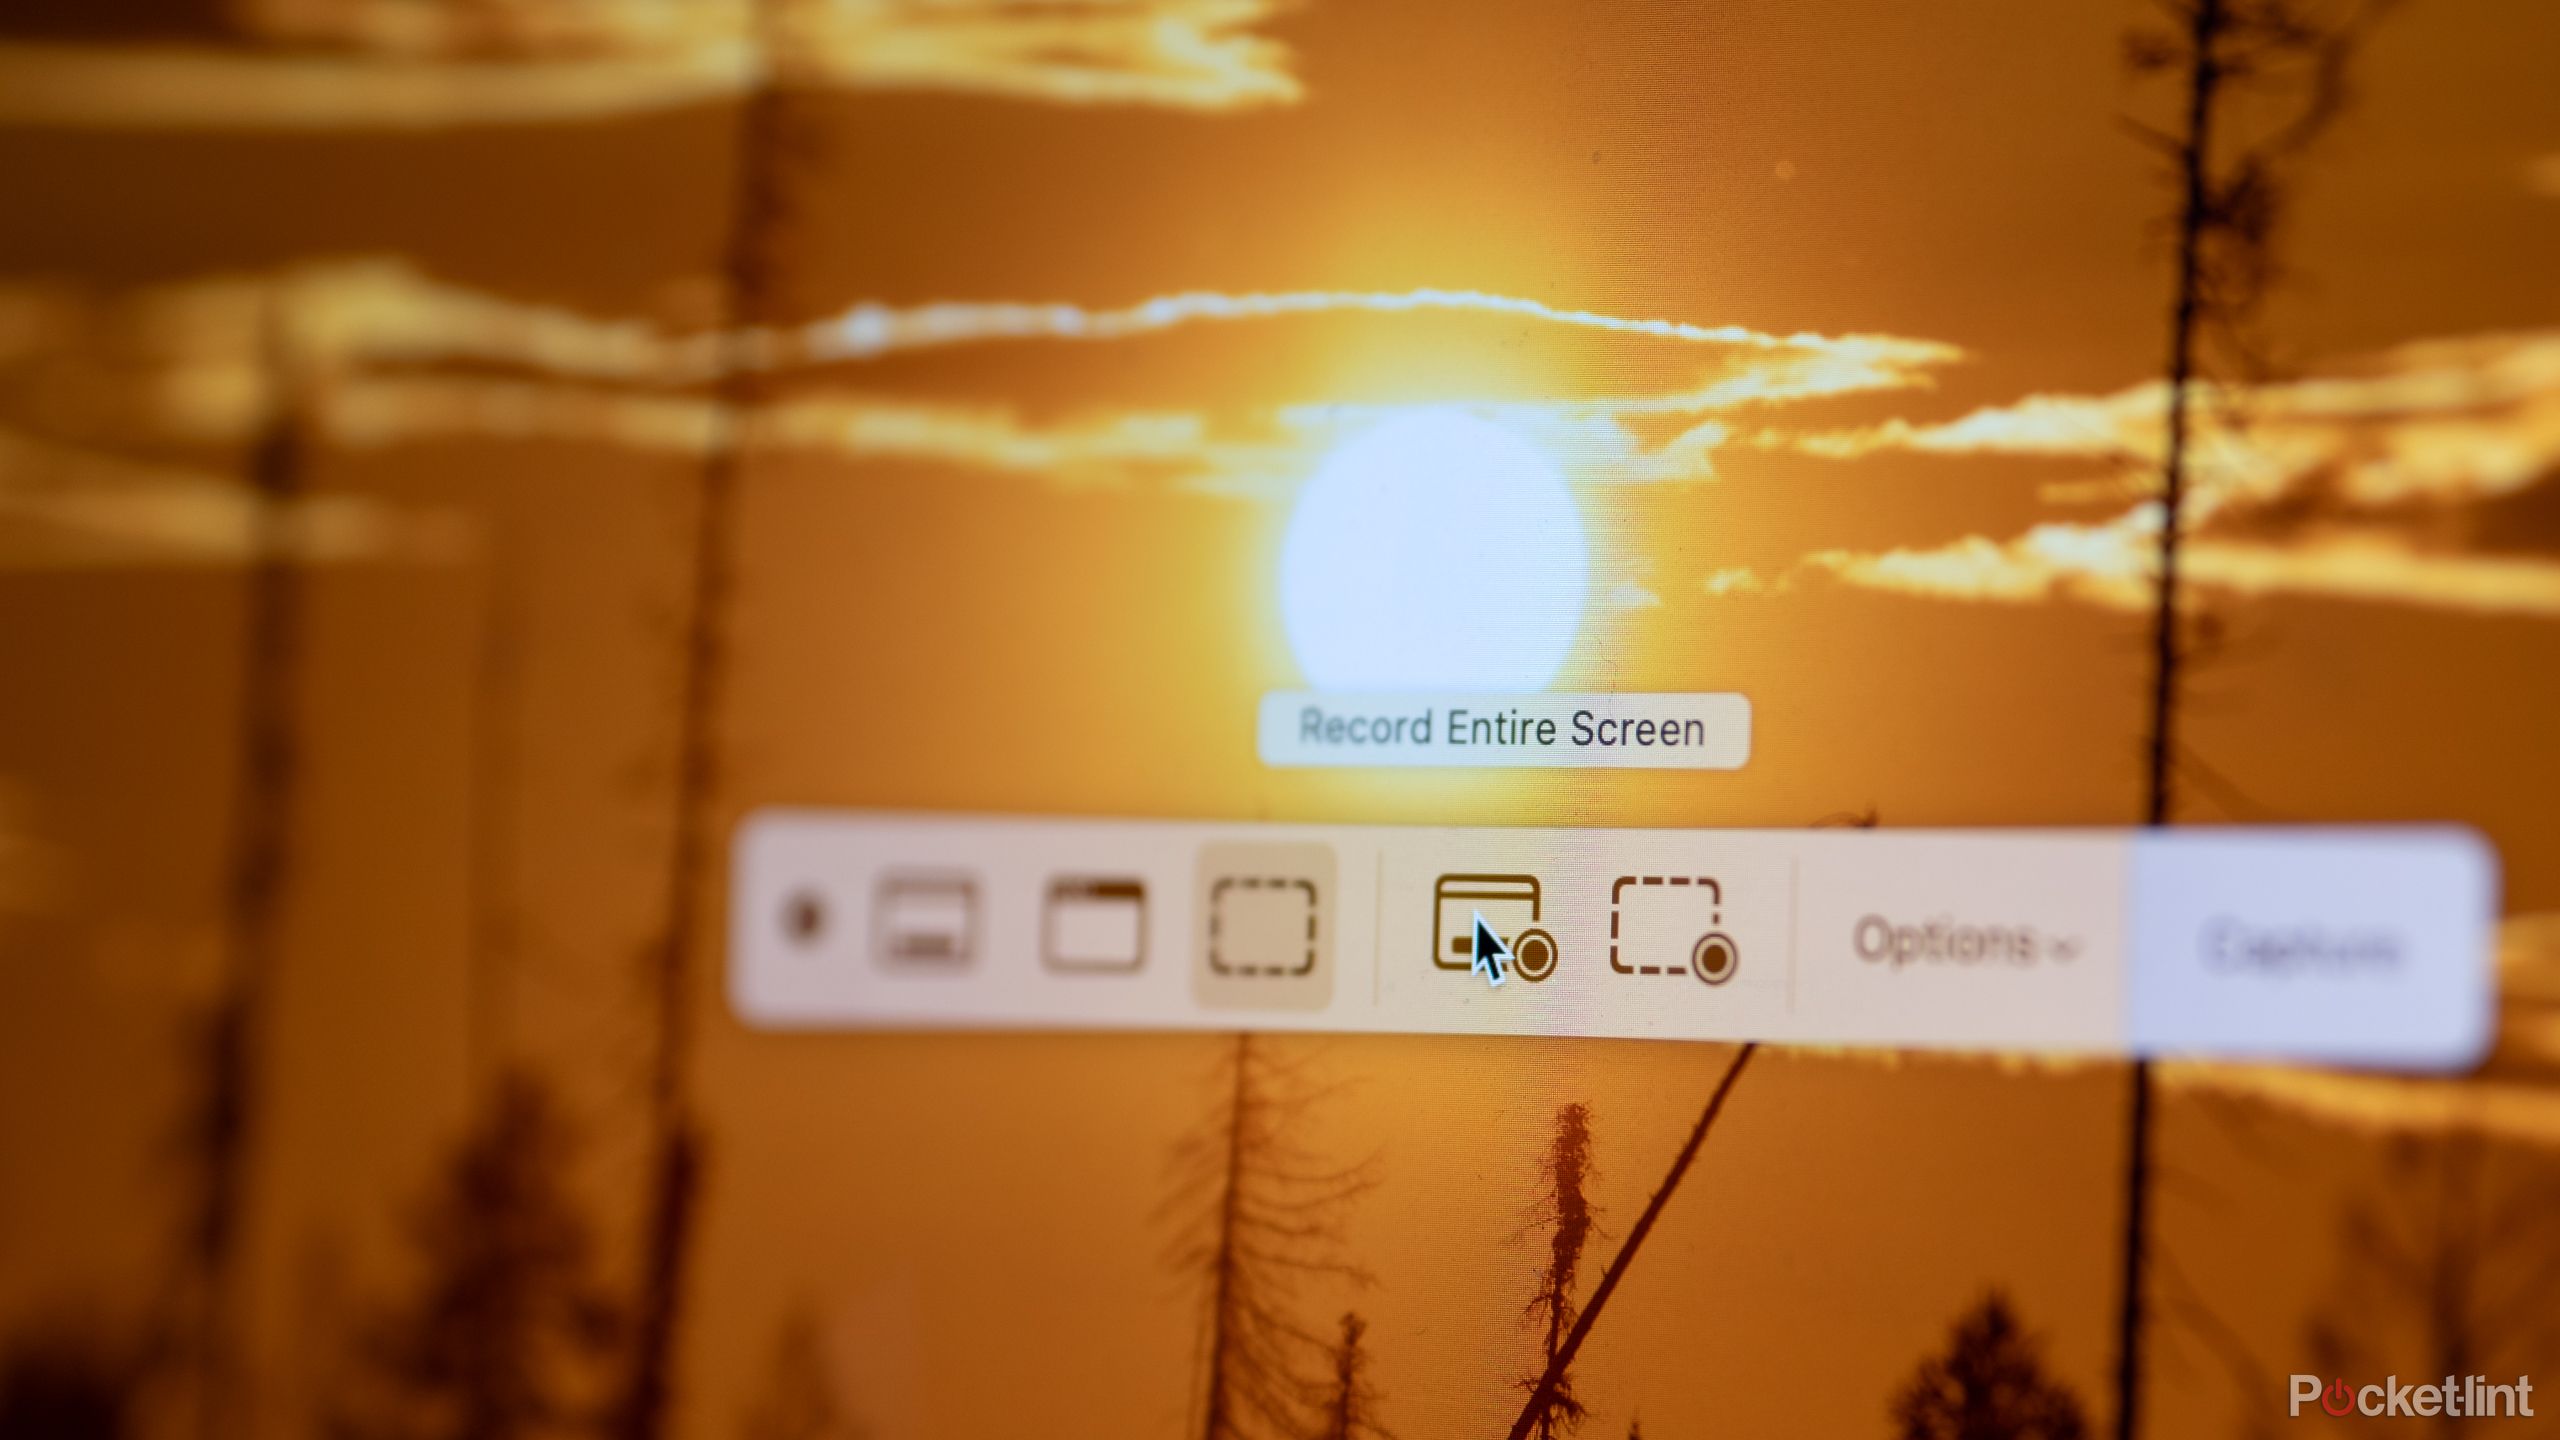
In the toolbar that pops up, the first three options are for photos, but the next two are for recording a video, designated by the small circle record icon in the corner. Choose one of these two options -- if you are unsure what the icon means, hold the mouse over the icon and the explanation will pop up:
- Record Entire Screen: This option starts a recording or video of your entire screen. If you have multiple apps open, all of them will be part of the recording.
- Record Selected Portion: Use this tool if you want to create a video of a small portion of your screen rather than the entire screen. Everything in the drawn-out window will be recorded. For example, if you don't want to include the Dock with the apps and minimized windows in your recording, you should use this option.
- Click the Record button on the toolbar.
- You're now recording -- do whatever it is that you would like to record.
- When you are finished recording, press the stop icon that is in the top toolbar, towards the right.

How do you copy and paste a screenshot on Mac?
When you take a screenshot on a Mac, a thumbnail preview will remain in the corner of the screen. You can drag and drop that small preview into an open Pages document or an open email to quickly add the image to what you are already working on.
The other option is to copy and paste the screenshot. To do that, you'll follow the steps above, except when you click to take the screenshot, hold down the control key. That copies the screenshot automatically. Then, you can use the command + V keyboard shortcut to paste the screenshot in the desired spot.
Where do screenshots go on a Mac?
By default, the screenshots on a Mac are saved to the desktop. However, it is possible to change where the resulting images are saved. While in the Screenshot app, click on "options" to choose a new location to save the files to.
How do you crop a screenshot on a Mac?
The easiest way to crop a screenshot on a Mac is to use the Capture Selected Portion tool in Screenshot, or the Shift + Command + 4 keyboard shortcut. This allows you to draw a box around what you want to include, so you won't need to crop it later.
If you want to crop an existing screenshot, you'll need a photo editor. But, the Preview app that comes with your Mac will work.
- Double-click the file to open it in Preview.
- Head to Tools > Rectangular Selection.
- Draw a box around the part of the screenshot that you would like to keep.
- Finally, use Tools > Crop or the keyboard shortcut Command + K to crop.