Quick Links
The Quest Pro is more than just a standalone VR headset, it can also be tethered to a PC for more usability and flexibility.
Using the connections in this guide you can set up your Quest Pro to play PCVR games or to be more productive by using the headset as a desktop replacement.
So stick with us as we guide you through the options and how to set them up.

How to connect Quest Pro with Oculus Link (and a cable)
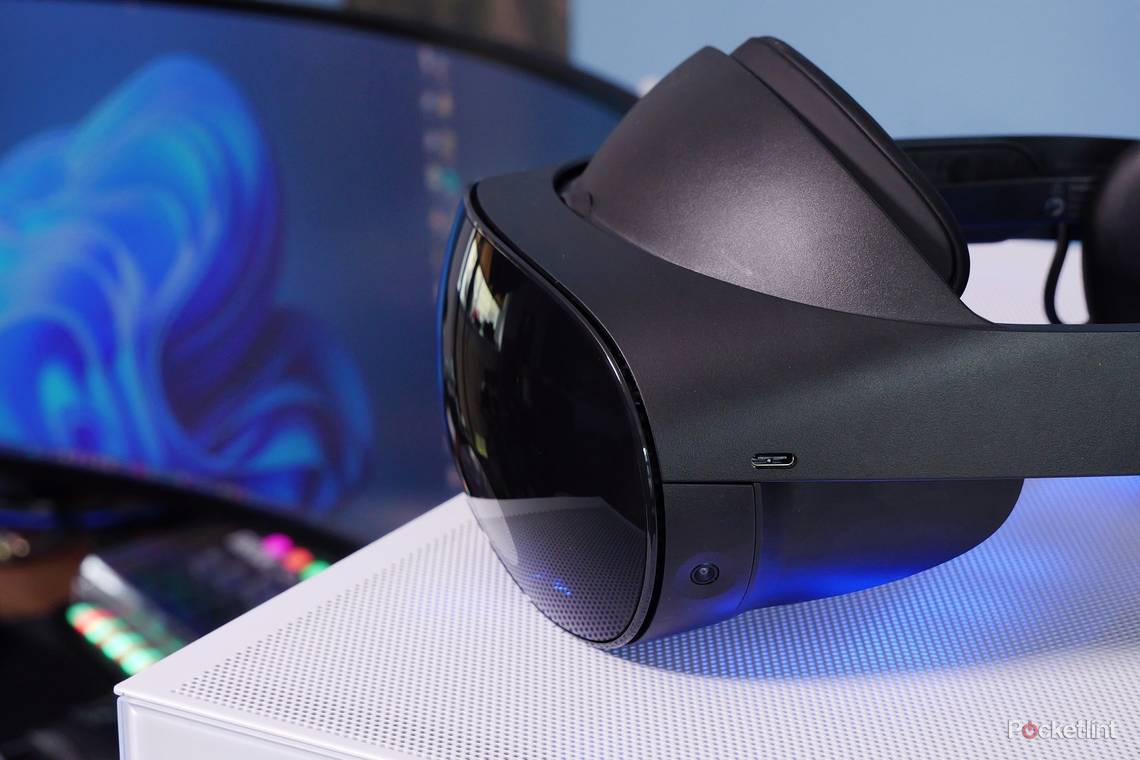
The most effective (low latency) way to connect your Meta Quest Pro to your desktop machine is with a cable.
You can do this using the cable that comes with the headset or with a fast USB-C cable. We'd recommend the official Quest Link cable as it's nice and long and guaranteed to work easily.
Connect the USB-C cable to your PC and the other end directly to the headset and you can then go about establishing the connection so you can see your desktop with ease.

Setup the Oculus Link software
The first step to connecting your Meta Quest Pro to your PC is to download and install the Oculus App on your Windows machine. This is the same app that you'd use to connect the Quest 2 or Rift S to your PC but it's essential to connect the Quest Pro in the same way. You will need to check that your PC meets the Quest Link compatibility requirements though.
Follow these steps to get started:
- Download and install the Oculus App on your PC
- Connect your Quest Pro to your PC using your USB-C cable
- Turn Quest Pro on to establish the connection
- Select the option to use the link cable
- Put your headset on and click the prompts to allow the connection

When this is done you'll still need to launch the headset into Quest Link mode. To do this follow these steps:
- Press the menu button on your right controller to access settings
- On the navigation that pops up click the clock/power symbol on the bottom left
- Then you'll see various different options including Quest Link
- You'll need to click that to launch the Quest Link mode
Doing this puts you in a different view with slightly different options. You'll need to use the Meta Quest Pro controllers to access the options. But you'll see a new menu bar that includes options to show desktop apps from your PC or to view an entire desktop.
Click on the desktop options in the menu and you can then see a virtual view of what's on your PC desktop. If you have more than one monitor in the real world then you'll see options to switch between multiple desktops. Click on whichever is the most relevant and start using your PC. You can then navigate around using your keyboard and mouse as you would on your PC.
When you need to, you can disable Oculus Link from within the settings. Disabling it will put you back into the usual view you'd see when running the headset.
NOTE - when in Quest Link mode, you can adjust the size of your desktop view and the distance from you by pressing the grip button on the right hand controller and pushing the thumbstick in the relevant direction (you'll see a pop-up).
How to connect Quest Pro to your PC wirelessly
Connecting your Meta Quest Pro to your PC using a high-speed cable is the way to get the best results possible. This ensures a low-latency connection and a smooth experience.
As with the Quest 2 though, it's possible to connect your Quest Pro wirelessly.
You do need a few things for the best results though:
- A good solid home Wi-Fi network
- To be within 20 feet of your router
- Connect your PC to your router with an Ethernet cable
- Ideally use a 5GHz wireless connection instead of 2.4GHz
As long as you tick all those boxes you'll be able to use the Quest Pro wirelessly. The process to do so is much the same as setting up the wired connection. So if you've already done that then it's fairly straightforward.
- First, connect the Quest Pro to your PC using the Quest Link cable
- Install and launch the Oculus app on your PC if you haven't already
- If you don't see a pop up click on "devices" on the left menu
- Click on your Meta Quest Pro headset under the device list
- Click on "device setup" at the bottom
- Then select Air Link (Wireless) from the connection options

You'll then need to put the headset on to change a few settings in there:
- Press the menu button on your right controller to access the settings
- On the navigation that pops up click the clock/power symbol on the bottom left
- Then you'll see various different options including Quest Link
- Click on Quest Link and you'll see an option to activate wireless pairing
- Turn that on and you should then see your PC listed in the options
- Click that and you'll then see a pairing code displayed on the headset
- Take the headset off and click to confirm the code on your desktop machine
- Then put the headset back on and you can launch Quest Link in wireless mode
- Unplug the headset from your PC and enjoy

You then have a different view in virtual reality which allows you to access your desktops and use your PC as you would normally. You can use your keyboard and mouse and just go about your business but on a much bigger screen.

How to play PCVR games on the Quest Pro
If you have exhausted the Quest store and want more games to play then there's good news as you can use your PC to access more games.
If you've already used Quest Link either wired or wirelessly then it's easy to run Steam VR to play more.
- First, you'll need to install both the SteamVR app (within Steam) and buy or download some Steam VR games
- When that's done launch the Oculus app on your PC and run the Quest Link connection on your headset so both are connected
- When the Quest Pro is in Quest Link mode, click to run Steam VR from your desktop (launch the app from Steam)
- Then select the game you want to play on Steam and click play
- This should see the Quest Link view replaced with the game view
- Enjoy