At is simplest a portrait is a description of a person, nothing more; but there's an art to taking a portrait photograph that's a combination of many more complex factors. Anyone can pick up a camera these days and take a photo - and that's part of the beauty of digital photography - but to take those portrait shots to the next level requires a little more thought, understanding and a lot of practice.
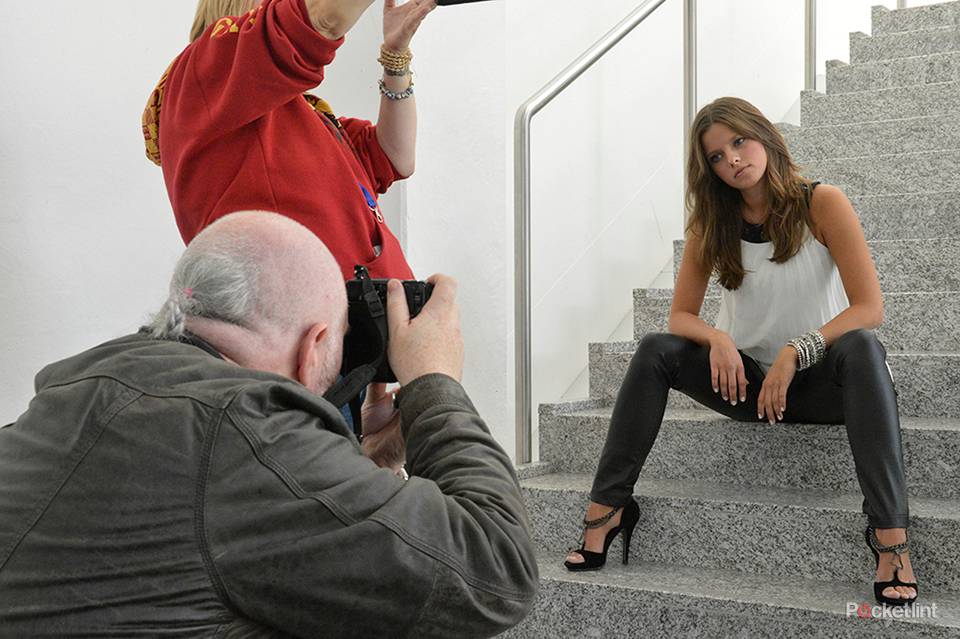
Pocket-lint caught up with well-known portrait photographer Damian McGillicuddy - AKA "the big dog" - in Cologne at the Photokina 2012 camera show for a bit of a chin wag and to see the man in action on a shoot.
It's doesn't take a genius to see where his nickname comes from. Big in stature, he walks with a cane and has a tightly-knit ponytail draped from the back of his otherwise hairless head; a bulldog without the bite but the big man has a big heart for photography, which he talks about with great freedom and greater passion.
"I wouldn't do anything else," he says with more puppy in his honest eyes than his nickname would suggest. "It's actually a privilege, I think, to earn a living from something I love doing. If I didn't, then I'd do it for pleasure."
McGillicuddy's not shy about revealing his trade secrets, and Pocket-lint took down a few tips on shooting great portraits from the man who went from wanting to airbrush Iron Maiden album covers as a teenager to a professional photographer decorated five times as the best in the UK.
Tip 1: Use an interchangeable lens camera
There's often a perception that you need a big, expensive camera to take the best shots, but that's something McGillicuddy disputes in the digital age.
"Once upon a time, photographers had to own Volvo estates [to cart their kit around]," he jests.
Digital has made things different, though, and that's something that's clear from the kit that McGillicuddy uses - the Olympus OM-D E-M5 compact system camera from the Micro Four Thirds stables.

"Olympus sent me an OM-D even though I had no intention of changing kit. But I opened the parcel and it had some nice shiny thing in it, so I got magpie syndrome and took it out."
"I didn't actually want it to work when I first saw it, 'cos it sort of dismantled my professional beliefs. But then I started using it and thought, 'It is rather good isn't it?' and, almost begrudgingly, it won me over. The weight and size makes my life easier."
Generally speaking an interchangeable lens camera, such as a DSLR, or compact system camera, is a good place to start if you want to take pro-looking portrait images. There are a number of reasons: that "blurred background" effect - described by a shallow depth of field and known as bokeh - is easier to achieve with a wide-aperture lens; but also the option to change lenses to a super-sharp optic will help "lift" an image above and beyond a smaller-sensor camera's abilities.
Tip 2: Lenses - natural to long focal length, wide aperture
Lenses can't be overlooked, and when asked what the "must have" bit of kit is for his shoots, McGillicuddy is quick to answer.
"I love the 45mm f/1.8 [Olympus M.Zuiko Digital]. Bang-for-buck-wise I think that it's stunning. If you own Micro Four Thirds but don't own one then I think you're mad."

Focal length is an important factor to consider too. Longer focal length lenses "flatten" an image, whereas wide-angle lenses exaggerate perspective - the latter is no good for portraits as it'll distort a face's natural shape. A longer focal length means you'll need to work at an increasingly longer distance though, but this also helps to give extra working space between you and your subject. You'll want to be close enough to communicate, but a posing subject won't be as comfortable with you right up in their face.
"The 75mm f/1.8 [Olympus M.Zuiko PW EZ] is possibly the best lens ever made. It's a stunning lens," continues McGillicuddy, but admits that it's used more indoors than at some more restrictive outdoor locations.

"I'm very lucky 'cos my camera room must be about 60 feet, so I can put any lens on and get what I want. But it's used less [the 75mm lens] if I'm outside or on location because of the physical space."
There's no reason why a beginner can't start out with a basic zoom lens however. It's an easy starting point to practice composition, and you can progress to prime lenses at a later date for optimum results, hence an interchangeable lens camera being the ideal working platform.
Tip 3: Use the light - shoot at dawn or dusk, use white balance
Whatever kit you happen to use, it's the light that makes a photograph. Think about it: without light there wouldn't be any photographs.
"Watch the way that natural light works. Try and have the light strike the subject obliquely," says McGillicuddy.
"You have to create shadow and highlight. Don't forget what you're trying to achieve is a three-dimensional 'lie' in a two dimensional medium. The only way we can do that is by the placement of shadow and highlight. So just watch the way the light falls. You needn't use flash, it doesn't have to be complicated, as long as you're watching the direction of light."
In sunlight, for example, avoid the subject staring at the sun as their face will squint-up and look uncomfortable.

Copyright Noukka Signe (via Flickr)
At the other end of the scale, if you shoot with the sun behind a subject it's likely to cause flare and silhouette the subject. If you expose correctly to compensate for this - whether by using exposure compensation or being a little experimental and using some on-camera fill-in flash - then it can create a striking image.
Another important factor is that light has colour. A camera is more sensitive to colour temperature than the human eye (as our brains "auto adjust" for it), so the auto white balance setting can make "mistakes" by judging the colour of clothing, surroundings and other factors.
Look at the white balance - often described as "WB" on your camera's d-pad or found within the quick menu - and play around with the settings. Skin should look like skin, or have a slightly warmer yellow/red tint to it rather than any green/blue oddities. That's why so many outdoor shots are shot during "the golden hours" or dawn or dusk where the light is less harsh and has a wonderful warm colour to it.

McGillicuddy always uses a fixed white balance value, often changing the manual white balance setting in camera when setting up a new angle at a shoot location.
Tip 4: Talk to your subject
At the heart of a portrait shot is a person, not a thing. The subject, and the professional relationship you have with them, is perhaps the most important part of all when it comes to shooting.
We watch McGillicuddy in action and he immediately establishes his method of control. His left hand is like a puppet master's string to control the face. He kindly explains to the model, Laura, that each subtle movement with that hand should be mirrored by her facial position.
Verbal feedback is equally integral. A subject, even an established model, isn't going to know how they look through the lens. If something's not quite right, then deliver instructions, but don't "bark" and do be full of praise when things look how you want.
"That's excellent, lovely," McGillicuddy bursts with great enthusiasm as things start to come together.
You wouldn't tell the Big Dog walks with a cane since a car accident as he bounds in and out of knee-height positions, excitedly finding different angles within each scene.
Expressions are difficult to dictate, but basic control such as instructing "how much smile" will help set the mood. If the expression looks genuine then, much like an actor, the shot looks convincing.
It's not a case of being patronising: both subject and photographer want good results, so it's all about rapport and communication. Be relaxed and it reflects back from the subject; allow enough breaks in between the face-holding poses for some idle banter and you'll get better results.
If you're new to it all, then start out with friends and family rather than jumping in at the deep end. But explain what you want to achieve, you can even find some pictures that you want to imitate in order to practise positions and poses before getting creative and working up your own shots.
Tip 5: Location and composition - no need for grandeur
As much as a portrait can be shot pretty much anywhere, it's always worth scouting out a location that's workable and complimentary.
Think about the subject's interaction with the space too. A wall to lean on, a step to sit on, or introduce your own props as part of the composition. Whether a chair, a scarf, something to hold in the hand - all these things will adjust the way the subject sits within a given environment.

It's all about the long game too; one shot won't cut it. Shoot and shoot again, and when you're done with that, shoot some more. McGillicuddy shot extensively before re-using the same location from different angles and viewpoints to get the best out of the situation.
A location needn't be grand either. We shot in a stairwell full of discarded cardboard boxes by a giant fire exit. Face firmly fixed to viewfinder, the scene unfolds differently through the lens. Use that "cropped" frame to get an accurate preview of how the scene will look - on the stairs, for example, it was the series of lines that added some background interest to the shot, without so much as introducing the rest of the surrounding scene.
If you're shooting in very public places then try and experiment with movement. A "frozen" subject in a bustling city, for example, brings attention and focus to the subject.
"I'd had just finished a job, and then I did something I've not done for years," says McGillicuddy pausing as he reflects on a recent trip to New York City.
"Rather than putting the OM-D away, I stuck a smaller lens on it and took it out with me. I found myself doing things that I hadn't done for years, playing around with shots in Times Square with longer shutter speeds of taxis streaking past. And it was just being done for the joy of it which was well cool."
There are opportunities everywhere.
Tip 6: Advanced lighting
If you're thinking, "Ah, but McGillicuddy's a pro with external lighting, loads of kit and assistants" then you would be right, but think of that as aspiration rather than a barrier. Everyone has to start somewhere, says McGillicuddy.

"I'm the first person to admit that I don't know everything. I learn something new every day. And if I'm learning something new nearly 30 years on then, well, y'know, it's a steep learning curve if you've only just picked up the camera. I reckon I was doing this for 10 year before I shot anything half decent. It's a constant process of refinement. Looking at what you've got and taking it from there."
Trial and error will work a treat, and that can be done without the need for a real person in front of you. Whether a lighting stand with a dummy head on or something similar, a digital camera will let you test out all manner of things with immediate results on the LCD screen.
First would be the use of a reflector. You can buy them - and McGillicuddy's keen to point out that he makes his own foldable range - but a large sheet of white card is a simple, budget way of getting light to bounce back on to a surface. If you see too much shadow to the side of a face, then some fill using reflected light will make all the difference, and you can see that difference in real time right in front of you. Just don't fill in so hard that all shadow has been lost, otherwise the three-dimensional effect is lost too.

More-advanced users may want to experiment with off-camera flash. The Olympus OM-D E-M5 has an infrared system built in to fire external lights, though McGillicuddy uses a third-party wireless transmitter to fire his off-camera flash guns.
"I often think that cameras are manufactured by engineers and not photographers: 'Where's the stupidest place to put the hotshoe?' - and it's not on top of the pentaprism is it? 'Cos it's not flattering. And that's why I like to get the light off the camera.
"It's imperative," he states firmly. "If you're not manipulating the light, the direction of the light - and it doesn't have to be flashlight - then you're wasting your time a bit. You can use ambient light, so long as there's a prevailing direction to it. You know, landscape guys get up at daft o'clock so the light's in the right place. Why should it be any different for portrait photographers? The light has to be in the right place."
As much as we might all know a good photograph when we see one, learning the finer details will take time. Make mistakes, have fun with it, and don't be afraid of equipment.
"Don't believe that technology will do it all for you. Learn the basics of photography first. Then let the technology make it easier for you, but it'll never replace the knowledge".
And his closing sentiment of advice?
"Everybody should take pictures. But better."