Analogue camera maker Lomography (or Lomo, to those in the know) has been driving the public's desire for retro cameras for a while now. Following on from the sucess of its first product (the LC-A+) and it's popular Diana F+ and Diana Mini models, the brand has introduced the Sprocket Rocket.
Our quick take
There's no denying that the Sprocket Rocket is a beautifully designed camera and it's sure to appeal to analogue shutterbugs and newcomers alike. At £79, the camera isn't exactly cheap, but it's not prohibitively expensive either and it does offer some a host of innovative features, such as sprocket photography and panoramic shots, all in one place. It can be more expensive and time-consuming to get sprocket films processed and while you do have the option of using the film guard to block the sprockets from shot, this slightly defeats the point of the camera. It's important to highlight the fact that the results from the camera are excellent and there's a lot of scope for experimentation.
If you're already into analogue photography or you're thinking about giving it a try, then the Sprocket Rocket is unlikely to disappoint - unless you forget to remove the lens cap before you start shooting.

Lomography Sprocket Rocket - 4.5 / 5
| FOR | AGAINST |
|---|---|
|
|
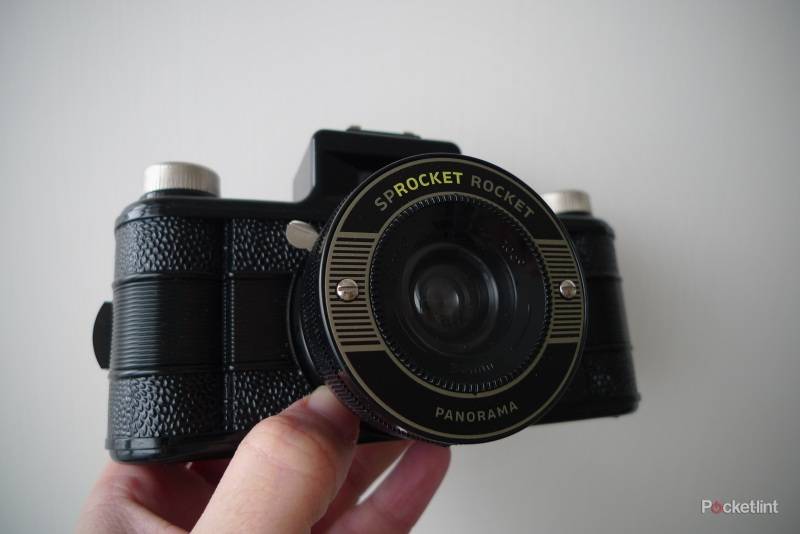
The latest addition to Lomo's fast-expanding lineup of analogue snappers, the new model uses an extra-wide lens to capture panoramic shots and, as the name suggests, the camera uses the full size of the film including the sprocket holes and numbering at the edge. The additon of a rewind dial makes it possible for you to wind the film backwards as well as forwards between frames in order to get some really interesting effects. We recently reviewed the Lomo 360 Spinner - a 360-degree panoramic camera. While it's a great piece of kit, it is slightly bulky and cumbersome, while the newer Sprocket Rocket offers panoramic pictures (albeit not full 360-degrees) in a much more compact product.
Some models in the Lomo range use 120mm film that's notoriously hard to track down, unless you're lucky enough to live near one of the Lomo stores. Thankfully, the Sprocket Rocket uses conventional 35mm variety that can be picked up easily from anywhere that sells camera film, such as the chemist. If you're used to the simplicity of popping an SD card into your digital camera, then the idea of loading a film might sound mildly scary, not to mention ridiculously old-fashioned. Rest assured that getting your film in place is absolute child's play on the Sprocket Rocket. All you need to do is remove the back door of the camera, lift the winding knob, pop the film in, attach to the take-up spool on the right and wind on slightly to make sure it's firmly attached. If you follow the enclosed instructions, then you really can't go wrong.
The camera itself is a thing of beauty, with its stylish black finish and 1940s styling, its looks like something out of a spy film or a Dick Tracy comic. Although predominantly plastic, the camera's chassis is reassuringly sturdy, and certainly more robust that some of the brand's cheaper models such as the Diana Mini.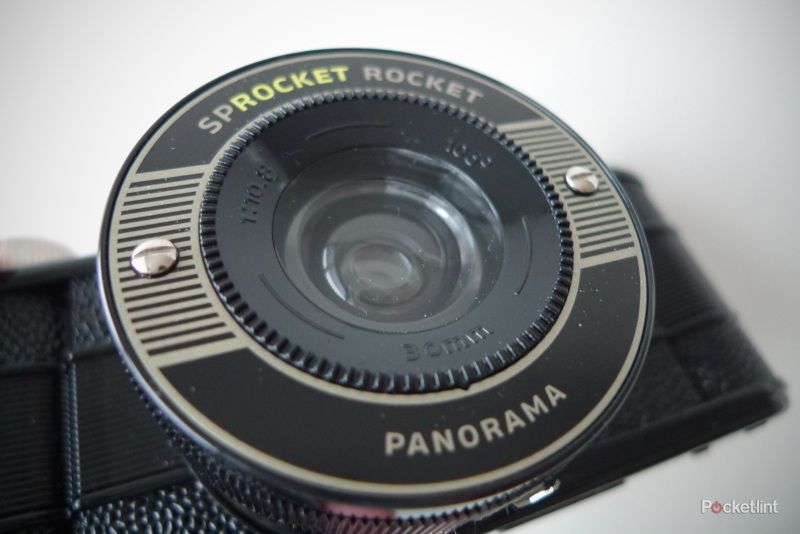
Before you start shooting, you need to decide on what film to use. You already know that you need 35mm, but what speed is it best? The camera's settings have been designed to use with ISO 400 film, but we think that ISO 800 is probably more suitable as it's more light-sensitive and more likely to give you better (and brighter) results. Once you've selected your film and loaded it up you need to adjust the camera's basic settings. Don't panic, as there only a few things to tinker with and once you know what they are, you'll be up and running in no time. Firstly, you need to adjust the shutter setting, using the lever located on top of the lens. The N setting (1/100) is what you need for daytime snapshots, while the B setting (Bulb) is for unlimited indoor and nighttime exposures - simply keep your finger pressed down on the shutter release for as long as you would like to expose.
Secondly, you can adjust the aperture setting using the lever on the bottom of the lens. The Cloudy option (F/10.8) is for shooting indoors or with low light outside, while the Sunny setting is for when it's, er, sunny. We found it best to keep it on Cloudy pretty much all the time, unless it's a really, really bright day. Thirdly, you can tweak the focus using the ring on the front of the lens. You can choose the 0.6-1 metre setting for when you're taking close-up shots or opt for the 1 metre to infinity position for normal, mid-range and long-range shots.

In theory, as the camera uses 35mm film, you can get it developed anywhere from the local chemist to Snappy Snaps. If you do go down this route, then you'll need to let them know to expect panoramic shots, rather than the usual 36 shots. Ask them not to cut the negative, which you can then scan yourself. You'll also want to ask them for "no colour correction" when you drop your film off. If possible, it's best to get your film developed at a Lomo store. This isn't the cheapest option, but you can choose between basic processing, or having your pictures printed or put onto disc (or both) and at least you'll know that the Lomo peeps will know what to expect and won't tinker with or try to colour correct your film.
If you don't want the sprockets to appear on your pictures, then the camera comes with a small plastic frame mask that can be left inside the back of the camera to block them. This means that you'll simply get the panoramic snaps without the holes and numbering along the edge, and it'll probably take less time to develop them too.
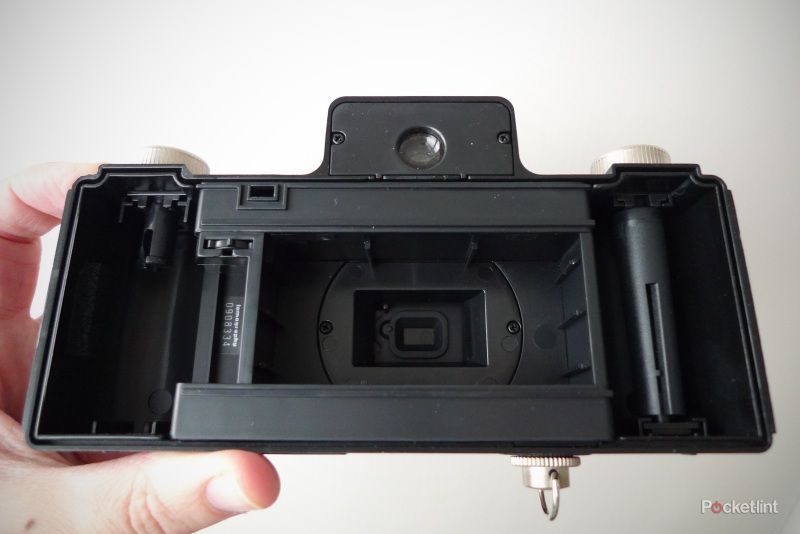
The image size you'll get from the Sprocket Rocket is 72 x 33mm, or 72 x 24mm if you're using the frame mask. While the wide-angle 30mm lens lets you take cool, panoramic shots that are wider than conventional snaps, obviously that means that you won't get as many snaps from your film as you usually would. You should get around 18 shots on a normal 36-exposure film (we actually got 17 snaps from one of our test films and 21 from the other).
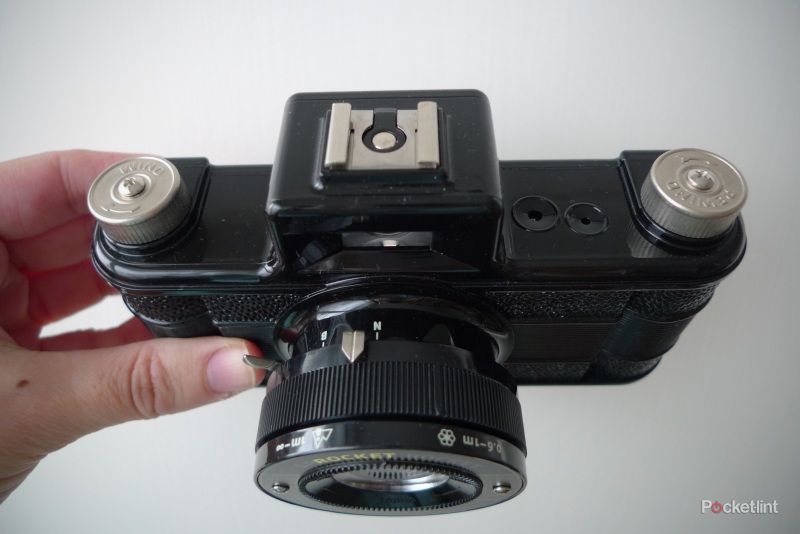
Sporting a hot shoe adaptor on the top of the chassis, the camera enables you to hook up a flash for shooting in low-lighting conditions. Be warned though, the flash only really works on fairly close-up shots, usually around 1-2m, depending on the flash you're using.
When you first load the film, you need to make sure that the white dot is visible in the film-stopping reference window on the top of the camera. If you want to take regular panoramic shots, without any multiple exposures, you can then use this as a reference - when winding on the film between snaps, you simply need to keep going until the white dot is visible again each time. Alternatively, you can experiment with double and multiple exposures, either by not winding the film on between two shots or by winding it backwards and forwards as much as you like before taking the next photo.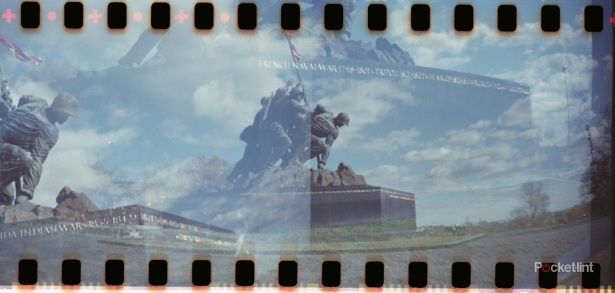
We found the Sprocket Rocket very easy to use - it was was comfortable to hold and the shutter release lever has a very satisfying click to it. Likewise, the winding motion is extremely smooth and pleasing to use. There doesn't seem to be anywhere to attach a camera strap - not a deal-breaker, but it could possibly be a camera-breaker if your new Sprocket Rocket slips from you hand. Although, hopefully that won't happen, as the textured finish provides plenty of grip for your sweaty mitts. Unlike a digital camera, the Sprocket Rocket, along with many other analogue models, will still let you take a picture, even if you haven't removed the lens cap - so make sure that you double check before you start or you could end up collecting a series of disappointingly blank snapshots.
To recap
A great snapper that looks good and offers superb images with lots of flexibility